BIG-IP VE in Red Hat OpenShift Virtualization
Running BIG-IP VE in OpenShift Virtualization allows for VM and modern apps/Kubernetes to convergence, simplifying management and operations. This article covers best practices for running BIG-IP VE in the KubeVirt (KVM) implementation by Red Hat. All the best practice recommendations in this article are aligned with the OpenShift Virtualization Reference Implementation Guide.41Views1like0CommentsUsing BIG-IP GTM to Integrate with Amazon Web Services
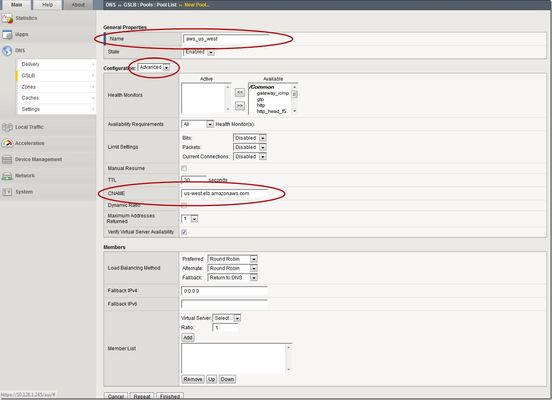
This is the latest in a series of DNS articles that I've been writing over the past couple of months. This article is taken from a fantastic solution that Joe Cassidy developed. So, thanks to Joe for developing this solution, and thanks for the opportunity to write about it here on DevCentral. As a quick reminder, my first six articles are: Let's Talk DNS on DevCentral DNS The F5 Way: A Paradigm Shift DNS Express and Zone Transfers The BIG-IP GTM: Configuring DNSSEC DNS on the BIG-IP: IPv6 to IPv4 Translation DNS Caching The Scenario Let's say you are an F5 customer who has external GTMs and LTMs in your environment, but you are not leveraging them for your main website (example.com). Your website is a zone sitting on your windows DNS servers in your DMZ that round robin load balance to some backend webservers. You've heard all about the benefits of the cloud (and rightfully so), and you want to move your web content to the Amazon Cloud. Nice choice! As you were making the move to Amazon, you were given instructions by Amazon to just CNAME your domain to two unique Amazon Elastic Load Balanced (ELB) domains. Amazon’s requests were not feasible for a few reasons...one of which is that it breaks the RFC. So, you engage in a series of architecture meetings to figure all this stuff out. Amazon told your Active Directory/DNS team to CNAME www.example.com and example.com to two AWS clusters: us-east.elb.amazonaws.com and us-west.elb.amazonaws.com. You couldn't use Microsoft DNS to perform a basic CNAME of these records because of the BIND limitation of CNAME'ing a single A record to multiple aliases. Additionally, you couldn't point to IPs because Amazon said they will be using dynamic IPs for your platform. So, what to do, right? The Solution The good news is that you can use the functionality and flexibility of your F5 technology to easily solve this problem. Here are a few steps that will guide you through this specific scenario: Redirect requests for http://example.com to http://www.example.com and apply it to your Virtual Server (1.2.3.4:80). You can redirect using HTTP Class profiles (v11.3 and prior) or using a policy with Centralized Policy Matching (v11.4 and newer) or you can always write an iRule to redirect! Make www.example.com a CNAME record to example.lb.example.com; where *.lb.example.com is a sub-delegated zone of example.com that resides on your BIG-IP GTM. Create a global traffic pool “aws_us_east” that contains no members but rather a CNAME to us-east.elb.amazonaws.com. Create another global traffic pool “aws_us_west” that contains no members but rather a CNAME to us-west.elb.amazonaws.com. The following screenshot shows the details of creating the global traffic pools (using v11.5). Notice you have to select the "Advanced" configuration to add the CNAME. Create a global traffic Wide IP example.lb.example.com with two pool members “aws_us_east” and “aws_us_west”. The following screenshot shows the details. Create two global traffic regions: “eastern” and “western”. The screenshot below shows the details of creating the traffic regions. Create global traffic topology records using "Request Source: Region is eastern" and "Destination Pool is aws_us_east". Repeat this for the western region using the aws_us_west pool. The screenshot below shows the details of creating these records. Modify Pool settings under Wide IP www.example.com to use "Topology" as load balancing method. See the screenshot below for details. How it all works... Here's the flow of events that take place as a user types in the web address and ultimately receives the correct IP address. External client types http://example.com into their web browser Internet DNS resolution takes place and maps example.com to your Virtual Server address: IN A 1.2.3.4 An HTTP request is directed to 1.2.3.4:80 Your LTM checks for a profile, the HTTP profile is enabled, the redirect request is applied, and redirect user request with 301 response code is executed External client receives 301 response code and their browser makes a new request to http://www.example.com Internet DNS resolution takes place and maps www.example.com to IN CNAME example.lb.example.com Internet DNS resolution continues mapping example.lb.example.com to your GTM configured Wide IP The Wide IP load balances the request to one of the pools based on the configured logic: Round Robin, Global Availability, Topology or Ratio (we chose "Topology" for our solution) The GTM-configured pool contains a CNAME to either us_east or us_west AWS data centers Internet DNS resolution takes place mapping the request to the ELB hostname (i.e. us-west.elb.amazonaws.com) and gives two A records External client http request is mapped to one of the returned IP addresses And, there you have it. With this solution, you can integrate AWS using your existing LTM and GTM technology! I hope this helps, and I hope you can implement this and other solutions using all the flexibility and power of your F5 technology.2.8KViews1like14CommentsF5 BIG-IP deployment with Red Hat OpenShift - keeping client IP addresses and egress flows
Controlling the egress traffic in OpenShift allows to use the BIG-IPfor several use cases: Keeping the source IP of the ingress clients Providing highly scalable SNAT for egress flows Providing security functionalities for egress flows83Views0likes0Comments
F5 XC WAF requirement is to allow traffic from specific source site on downstream and upstream side.
We want to allow traffic from CHE and MUM site only at downstream connectivity and also at upstream connection should be from same sites only. As over firewall we allowed traffic from F5 ASIA regions IP only. Downstream: As we have specific VIP IP, if we made same changes in VIP Advertisement does it pass only through MUM and CHE, as VIP belongs to ASIA region only. Upstream: We allowed traffic through Specific Virtual Site from INDIA only in Origin Server so it will help us to pass traffic through this site towards server.22Views0likes2CommentsOWASP Tactical Access Defense Series: Broken Function Level Authorization (BFLA)
Broken Function Level Authorization (BFLA) is a type of security vulnerability in web applications where an attacker can access functionality or perform actions they should not be authorized to perform. This problem happens when an application doesn’t check access control on functions or endpoints correctly. This lets users do things that are not allowed. In this article, we are going through API5 item from OWASP Top 10 API Security risks and exploring F5 BIG-IP Access Policy Manager (APM) as a role in our arsenal Let’s consider our test application for each retail agent to submit their sales data, but without the ability to retrieve any from the system. In HTTP terms, the retail agent can POST but not allowed to perform GET, while the manager can perform GET to check agents performance, and collected data. Mitigating Risks with BIG-IP APM BIG-IP APM per-request granularity: with per-request granularity, organizations can dynamically enforce access policies based on various factors such as user identity, device characteristics, and contextual information. This enables organizations to implement fine-grained access controls at the API level, mitigating the risks associated with Broken Function Level Authorization. Key Features: Dynamic Access Control Policies: BIG-IP APM empowers organizations to define dynamic access control policies that adapt to changing conditions in real-time. By evaluating each API request against these policies, BIG-IP APM ensures that authorized users can only perform specific authorized functions (actions) on specified resources. Granular Authorization Rules: BIG-IP APM enables organizations to define granular authorization rules that govern access to individual objects or resources within the API ecosystem. By enforcing strict permission checks at the object level, F5 BIG-IP APM prevents unauthorized functions. Related Content F5 BIG-IP Access Policy Manager | F5 Introduction to OWASP API Security Top 10 2023 OWASP Top 10 API Security Risks – 2023 - OWASP API Security Top 10 API Protection Concepts OWASP Tactical Access Defense Series: How BIG-IP APM Strengthens Defenses Against OWASP Top 10 OWASP Tactical Access Defense Series: Broken Object-Level Authorization and BIG-IP APM F5 Hybrid Security Architectures (Part 5 - F5 XC, BIG-IP APM, CIS, and NGINX Ingress Controller) OWASP Tactical Access Defense Series: Broken Authentication and BIG-IP APM OWASP Tactical Access Defense Series: Broken Object Property-Level Authorization and BIG-IP APM OWASP Tactical Access Defense Series: Unrestricted Resource Consumption76Views0likes0CommentsTransparent load balancing in Azure, Part 2
This article explains an advanced configuration of F5 BIG-IP behind Azure LB when running in Active/Standby mode and using the Floating IP option for forwarding traffic. This is intended to be a sequel to a previous article I read, but did not author, titled Transparent Load Balancing in Azure. If you read the previous article, you may see I’ve left a commentthat briefly describes some necessary details left out of the original article. This article covers an advanced scenario for running an Active/Standby BIG-IP pair behind Azure LB. Read and follow these instructions; allof the following conditions are met: You want to run 2x BIG-IP devices in Active/Standby configuration You plan to use Azure LB to provide High Availability (HA), as opposed to other methods like DNS or the Cloud Failover Extension Your intention is to have your BIG-IP’s Virtual Server IP address (VIP) be the same as the frontend ipconfig on the Azure LB. You have checked the “Floating IP” checkbox on your Azure LB rule that forwards traffic to BIG-IP Options for High Availability (HA) of Network Virtual Appliances (NVA’s) in Azure This article does not cover the advantages and disadvantages of different methods to achieve HA in Azure. There are multiple approaches: Azure Load Balancer. This approach uses a simple, L4 load balancer in Azure to disaggregate traffic across multiple devices. Active/Standby, Active/Active, or multiple standalone devices are options here. This article focuses on a scenario using Active/Standby BIG-IP devices behind Azure LB, when the “Floating IP” checkbox is checked on the Azure LB rule. F5 Cloud Failover Extension (CFE). This automation approach uses software on the BIG-IP device to ensure High Availability across devices that are Active/Standby, without requiring Azure LB. It can move IP addresses between Azure network interfaces (emulating Gratuitous ARP that happens on-prem) It can update a route table to ensure the default route (0.0.0.0/0) for a subnet sends response traffic to remote clients back via the active BIG-IP. It can update a route table to point an entire CIDR block dedicated for VIPs at the active device. This is also referred to as an “alien range” approach. DNS Load Balancing. A simple method for High Availability between devices is using DNS and multiple standalone appliances. However DNS load balancing within a local site is not common (although GSLB is a common practice across geographic regions) Other approaches. Azure offers a Gateway Load Balancer that F5supportsbut this requires advanced knowledge, and you might even consider BGP insome cloud scenarios. These are out of scope for this article. Common Architecture of Azure LB with BIG-IP pair The most common way to run Active/Standby BIG-IP devices behind Azure LB looks like the following diagram. Taking a closer look at IP addressing with this common architecture Let’s take a look at where we configure IP addresses based on the most common approach: There’s a few things here that sometimes confuse the first-time cloud admin: this solution requires 2x IP addresses for every Virtual Server on BIG-IP. You could create 2 separate VS’s, each with 1 IP address. You could also create a single VS with 2x IP’s using Shared Address lists, or your Virtual Address could be a /30 range. Either way, it’s different than what you’re accustomed to on-prem. this means IP addresses will get used up twice as fast as we’re accustomed to multiple destination NAT’s can sometimes confuse app owners (although normally a network admin has no problem understanding this) When and why to use Azure LB’s “Floating IP” option Thefloating IP checkboxon your Azure LB rule could be understood as telling Azure LB: “do not perform Destination NAT for this traffic”. This is similar to F5’snPath (aka asymmetric, or Direct Server Return) architecture. Why would you configure as above? No destination NAT at Azure LB can make overall IP addressing easier 1x IP Address on your BIG-IP VIP is more like on-prem config we are familiar with How to configure BIG-IP when “Floating IP” is used The previous option is an alternative approach, but it requires a semi-advanced workaround for Azure health checks.It’s important to understand this workaround and if you don’t, just stick with the common approach outlined first in this article. If you use Floating IP with your Azure LB rule, health probes from Azure LB will target the primary ipconfig on the Azure NIC. In BIG-IP, that’s your Self IP. And your Self IP will always respond healthy if it is probed, even on the Standby device (of course, port lockdown settings on Self IP’s must allow health checks). Put another way: your Standby BIG-IP will respond as healthy to Azure LB, and Azure LB will send data plane traffic to it. This will cause problems, so we must make our Standby BIG-IP “unhealthy” in Azure LB. Enter VIP targeting and iRules. Do this: Create LB rule on Azure LB sending traffic to the primary ipconfig on the dataplane NIC on the BIG-IP devices. Configure a health probe for this rule. A HTTP health check with default settings is fine. Create an iRule on BIG-IP: when HTTP_REQUEST { HTTP::respond 200 content "device is active" } Create a VIP called /Common/unroutable_vip and give it an IP address of 255.255.255.254. Attach the iRule from the previous step. This VIP will only be reachable on the Active device, and is not routable from outside of BIG-IP. Create another iRule: when HTTP_REQUEST { virtual /Common/unroutable_vip } On BIG-IP Device 1, create a VIP with the same IP addresses as the Self IP.This is allowed. Listen on port 80, add HTTP profile, and attach the above iRule. On BIG-IP Device 2, notice that the VIP created in the above step is not sync’d to Device 2. Repeat the above step with a VIP created on the same IP address as the Self IP. Now, your Azure LB will health check both devices, sending HTTP health checks to both devices and hitting the VIP’s you created on the Self IP’s. However, only the active device will successfully forward traffic to this VIP called “unroutable” and the Standby device will fail to do this. This means that Azure LB will believe that the Active is health and the Standby is down. Don’t forget you’ll need theEnable IP Forwardingcheckbox checked on your BIG-IP’s interfaces in the Azure portal. Conclusion If all of the above makes sense, feel free to use Azure LB’s Floating IP checkbox on your Azure LB rules so that you can have the benefits of our last diagram. They are operational benefits only (fewer IP addresses used, potentially easier to understand for operators) but there is no functional or performance benefit to this method (no performance benefits or features/functionality enabled). Thanks for reading, and please ask questions via comments or message me directly using this website.268Views0likes0CommentsF5 XC vk8s workload with Open Source Nginx
I have shared the code in the link below under Devcentral code share: F5 XC vk8s open source nginx deployment on RE | DevCentral Here I will desribe the basic steps for creating a workload object that is F5 XC custom kubernetes object that creates in the background kubernetes deployments, pods and Cluster-IP type services. The free unprivileged nginx image nginxinc/docker-nginx-unprivileged: Unprivileged NGINX Dockerfiles (github.com) Create a virtual site that groups your Regional Edges and Customer Edges. After that create the vk8s virtual kubernetes and relate it to the virtual site."Note": Keep in mind for the limitations of kubernetes deployments on Regional Edges mentioned in Create Virtual K8s (vK8s) Object | F5 Distributed Cloud Tech Docs. First create the workload object and select type service that can be related to Regional Edge virtual site or Customer Edge virtual site. After select the container image that will be loaded from a public repository like github or private repo. You will need to configure advertise policy that will expose the pod/container with a kubernetes cluster-ip service. If you are deploying test containers, you will not need to advertise the container . To trigger commands at a container start, you may need to use /bin/bash -c -- and a argument."Note": This is not related for this workload deployment and it is just an example. Select to overwrite the default config file for the opensource nginx unprivileged with a file mount."Note": the volume name shouldn't have a dot as it will cause issues. For the image options select a repository with no rate limit as otherwise you will see the error under the the events for the pod. You can also configure command and parameters to push to the container that will run on boot up. You can use empty dir on the virtual kubernetes on the Regional Edges for volume mounts like the log directory or the Nginx Cache zone but the unprivileged Nginx by default exports the logs to the XC GUI, so there is no need. "Note": This is not related for this workload deployment and it is just an example. The Logs and events can be seen under the pod dashboard and even the container/pod can accessed. "Note": For some workloads to see the logs from the XC GUI you will need to direct the output to stderr but not for nginx. After that you can reference the auto created kubernetes Cluster-IP service in a origin pool, using the workload name and the XC namespace (for example niki-nginx.default). "Note": Use the same virtual-site where the workload was attached and the same port as in the advertise cluster config. Deployments and Cluster-IP services can be created directly without a workload but better use the workload option. When you modify the config of the nginx actually you are modifying a configmap that the XC workload has created in the background and mounted as volume in the deployment but you will need to trigger deployment recreation as of now not supported by the XC GUI. From the GUI you can scale the workload to 0 pod instances and then back to 1 but a better solution is to use kubectl. You can log into the virtual kubernetes like any other k8s environment using a cert and then you can run the command "kubectl rollout restart deployment/niki-nginx". Just download the SSL/TLS cert. You can automate the entire process using XC API and then you can use normal kubernetes automation to run the restart command F5 Distributed Cloud Services API for ves.io.schema.views.workload | F5 Distributed Cloud API Docs! F5 XC has added proxy_protocol support and now the nginx container can work directly with the real client ip addresses without XFF HTTP headers or non-http services like SMTP that nginx supports and this way XC now can act as layer 7 proxy for email/smpt traffic 😉. You just need to add "proxy_protocol" directive and to log the variable "$proxy_protocol_addr". Related resources: For nginx Plus deployments for advanced functions like SAML or OpenID Connect (OIDC) or the advanced functions of the Nginx Plus dynamic modules like njs that is allowing java scripting (similar to F5 BIG-IP or BIG-IP Next TCL based iRules), see: Enable SAML SP on F5 XC Application Bolt-on Auth with NGINX Plus and F5 Distributed Cloud Dynamic Modules | NGINX Documentation njs scripting language (nginx.org) Accepting the PROXY Protocol | NGINX Documentation312Views2likes1Comment