Generate private key w/ CSR via iControl REST
Problem this snippet solves: Generate a private key w/ CSR How to use this snippet: To create a private key with a CSR via iControl REST: POST URL:https://10.1.1.165/mgmt/tm/sys/crypto/key Use the data below as your payload. For the name field, it must end in .key or you will get a false 404! Code : { "name":"www.testing.com.key", "commonName":"www.testing.com", "keySize":"4096", "keyType":"rsa-private", "options":[{"gen-csr":"www.testing.com"}], "organization":"Let It Snow Corp.", "ou":"Ice Engineering", "city":"Calhoun", "state":"AZ", "admin-email-address":"jerry@letit.snow", "email-address":"beth@letit.snow", "subject-alternative-name":"DNS:www.testing.com", "challenge-password":"myP4ssword" } Tested this on version: 13.01.8KViews3likes11CommentsRelation between Cipher-Suite and Key-type of server certificate
I must noticed/learned these days, that specific allowed ciphers are useless if they are not matching with the key-type of the server-certificate from the clientSSL profile. I think it's not unusual that most server-certificate will still be generated with RSA 2k or 4k key-type. And those (older) certificates, which are already renewed a couple of times with the same key have even a higher chance to be a RSA type. But with this for example only the following two ciphers could be selected: ECDHE-RSA-AES128-GCM-SHA256/TLS1.2 ECDHE-RSA-AES256-GCM-SHA384/TLS1.2 If a client for example only supports the following two ciphers: ECDHE-ECDSA-AES128-GCM-SHA256/TLS1.2 ECDHE-ECDSA-AES256-GCM-SHA384/TLS1.2 Neither of these two will be choose, even if they are allowed/provided in the cipher-rule configuration of the BIG-IP. Is this really the case or are there any other dependencies, which are responsible for the „No shared ciphers between SSL peers“ log entry? I'm wondering, because I've never read about that in any of the tons of cipher documents and articles, I've read so far. => So can please someone share some detailed information about this relation? And if this behavior is true, does it makes sense and is it technical possible to create two different clientSSL profiles, one with a RSA-key and the other with a ECDSA-key and assign both to the VIP? Can the BIG-IP handle this and will choose the correct certificate/profile depending on the provided cipher-list from the client? Thank you! Regards Stefan :)Solved24Views0likes2CommentsJA4 Part 2: Detecting and Mitigating Based on Dynamic JA4 Reputation
In my previous article on JA4 I provided a brief introduction to what is JA4 and JA4+, and I shared an iRule that enables you to generate a JA4 client TLS fingerprint. But having a JA4 fingerprint (or any "identifier") is only valuable if you can take some action on it. It is even more valuable when you can take immediate action on it. In this article, I'll explain how I integrated F5 BIG-IP Advanced WAF with a third-party solution that allowed me to identify JA4s that were consistently doing "bad" things, build a list of those JA4s that have a "bad" reputation, pull that list into the F5 BIG-IP, and finally, make F5 Advanced WAF blocking decisions based on that reputation. Understanding JA4 Fingerprints It is important to understand that a JA4 TLS fingerprint, or any TLS fingerprint for that matter, is NOT a fingerprint of an individual instance of a device or browser. Rather, it is a fingerprint of a TLS "stack" or application. For example, all Chrome browsers of the same version and the same operating system will generate the same JA4 fingerprint*. Similarly, all Go HTTP clients with the same version and operating system will generate an identical JA4 fingerprint. Because of this, we have to be careful when taking action based on JA4 fingerprints. We cannot simply block in our various security devices based on JA4 fingerprint alone UNLESS we can be certain that ALL (or nearly all) requests with that JA4 are malicious. To make this determination, we need to watch requests over time. TLDR; I used CrowdSec Security Engine to build a JA4 real-time reputation database; and 3 irules, an iCall script, and a custom WAF violation to integrate that JA4 reputation into F5 BIG-IP Advanced WAF. CrowdSec and John Althouse - Serendipity While at Black Hat each year, I frequently browse the showroom floor (when I'm not working the F5 booth) looking for cool new technology, particularly cool new technology that can potentially be integrated with F5 security solutions. Last year I was browsing the floor and came across CrowdSec. As the name suggests, CrowdSec provides a crowd-sourced IP reputation service. I know, I know. On the surface this doesn't sound that exciting — there are hundreds of IP reputation services out there AND IP address, as an identifier of a malicious entity, is becoming (has become?) less and less valuable. So what makes CrowdSec any different? Two things jumped out at me as I looked at their solution. First, while they do provide a central crowd-sourced IP reputation service like everyone else, they also have "Security Engines". A security engine is an agent/application that you can install on-premises that can consume logs from your various security devices, process those logs based on "scenarios" that you define, and produce a reputation database based on those scenarios. This enables you to create an IP reputation feed that is based on your own traffic/logs and based on your own conditions and criteria for what constitutes "malicious" for your organization. I refer to this as "organizationally-significant" reputation. AND, because this list can be updated very frequently (every few seconds if you wanted) and pushed/pulled into your various security devices very frequently (again, within seconds), you are afforded the ability to block for much shorter periods of time and, possibly, more liberally. Inherent in such an architecture, as well, is the ability for your various security tools to share intelligence in near real-time. i.e. If your firewall identifies a bad actor, your WAF can know about that too. Within seconds! At this point you're probably wondering, "How does this have anything to do with JA4?" Second, while the CrowdSec architecture was built to provide IP reputation feeds, I discovered that it can actually create a reputation feed based on ANY "identifier". In the weeks leading up to Black Hat last year, I had been working with John Althouse on the JA4+ spec and was actually meeting him in person for the first time while there. So JA4 was at the forefront of my mind. I wondered if I could use CrowdSec to generate a reputation based on a JA4 fingerprint. Yes! You can! Deploying CrowdSec As soon as I got home from Black Hat, I started playing. I already had my BIG-IP deployed, generating JA4s, and including those in the WAF logs. Following the very good documentation on their site, I created an account on CrowdSec's site and deployed a CrowdSec Security Engine on an Ubuntu box that I deployed next to my BIG-IP. It is beyond the scope of this article to detail the complete deployment process but, I will include details relevant to this article. After getting the CrowdSec Security Engine deployed I needed to configure a parser so that the CrowdSec Security Engine (hereafter referred to simply as "SE") could properly parse the WAF logs from F5. Following their documentation, I created a YAML file at /etc/crowdsec/parsers/s01-parse/f5-waf-logs.yaml: onsuccess: next_stage debug: false filter: "evt.Parsed.program == 'ASM'" name: f5/waf-logs description: "Parse F5 ASM/AWAF logs" pattern_syntax: F5WAF: 'unit_hostname="%{DATA:unit_hostname}",management_ip_address="%{DATA:management_ip_address}",management_ip_address_2="%{DATA:management_ip_address_2}",http_class_name="%{DATA:http_class_name}",web_application_name="%{DATA:web_application_name}",policy_name="%{DATA:policy_name}",policy_apply_date="%{DATA:policy_apply_date}",violations="%{DATA:violations}",support_id="%{DATA:support_id}",request_status="%{DATA:request_status}",response_code="%{DATA:response_code}",ip_client="%{IP:ip_client}",route_domain="%{DATA:route_domain}",method="%{DATA:method}",protocol="%{DATA:protocol}",query_string="%{DATA:query_string}",x_forwarded_for_header_value="%{DATA:x_forwarded_for_header_value}",sig_ids="%{DATA:sig_ids}",sig_names="%{DATA:sig_names}",date_time="%{DATA:date_time}",severity="%{DATA:severity}",attack_type="%{DATA:attack_type}",geo_location="%{DATA:geo_location}",ip_address_intelligence="%{DATA:ip_address_intelligence}",username="%{DATA:username}",session_id="%{DATA:session_id}",src_port="%{DATA:src_port}",dest_port="%{DATA:dest_port}",dest_ip="%{DATA:dest_ip}",sub_violations="%{DATA:sub_violations}",virus_name="%{DATA:virus_name}",violation_rating="%{DATA:violation_rating}",websocket_direction="%{DATA:websocket_direction}",websocket_message_type="%{DATA:websocket_message_type}",device_id="%{DATA:device_id}",staged_sig_ids="%{DATA:staged_sig_ids}",staged_sig_names="%{DATA:staged_sig_names}",threat_campaign_names="%{DATA:threat_campaign_names}",staged_threat_campaign_names="%{DATA:staged_threat_campaign_names}",blocking_exception_reason="%{DATA:blocking_exception_reason}",captcha_result="%{DATA:captcha_result}",microservice="%{DATA:microservice}",tap_event_id="%{DATA:tap_event_id}",tap_vid="%{DATA:tap_vid}",vs_name="%{DATA:vs_name}",sig_cves="%{DATA:sig_cves}",staged_sig_cves="%{DATA:staged_sig_cves}",uri="%{DATA:uri}",fragment="%{DATA:fragment}",request="%{DATA:request}",response="%{DATA:response}"' nodes: - grok: name: "F5WAF" apply_on: message statics: - meta: log_type value: f5waf - meta: user expression: "evt.Parsed.username" - meta: source_ip expression: "evt.Parsed.ip_client" - meta:violation_rating expression:"evt.Parsed.violation_rating" - meta:request_status expression:"evt.Parsed.request_status" - meta:attack_type expression:"evt.Parsed.attack_type" - meta:support_id expression:"evt.Parsed.support_id" - meta:violations expression:"evt.Parsed.violations" - meta:sub_violations expression:"evt.Parsed.sub_violations" - meta:session_id expression:"evt.Parsed.session_id" - meta:sig_ids expression:"evt.Parsed.sig_ids" - meta:sig_names expression:"evt.Parsed.sig_names" - meta:method expression:"evt.Parsed.method" - meta:device_id expression:"evt.Parsed.device_id" - meta:uri expression:"evt.Parsed.uri" nodes: - grok: pattern: '%{GREEDYDATA}X-JA4: %{DATA:ja4_fp}\\r\\n%{GREEDYDATA}' apply_on: request statics: - meta: ja4_fp expression:"evt.Parsed.ja4_fp" Sending WAF Logs On the F5 BIG-IP, I created a logging profile to send the WAF logs to the CrowdSec Security Engine IP address and port. Defining "Scenarios" At this point, I had the WAF logs being sent to the SE and properly being parsed. Now I needed to define the "scenarios" or the conditions under which I wanted to trigger and alert for an IP address or, in this case, a JA4 fingerprint. For testing purposes, I initially created a very simple scenario that flagged a JA4 as malicious as soon as I saw 5 violations in a sliding 30 second window but only if the violation rating was 3 or higher. That worked great! But that would never be practical in the real world (see the Understanding JA4 Fingerprints section above). I created a more practical "scenario" that only flags a JA4 as malicious if we have seen at least X number of requests AND more than 90% of requests from that JA4 have triggered some WAF violation. The premise with this scenario is that there should be enough legitimate traffic from popular browsers and other client types to keep the percentage of malicious traffic from any of those JA4s below 90%. Again, following the CrowdSec documentation, I created a YAML file at /etc/crowdsec/scenarios/f5-waf-ja4-viol-percent.yaml: type: conditional name: f5/waf-ja4-viol-percent description: "Raise an alert if the percentage of requests from a ja4 finerprint is above X percent" filter: "evt.Meta.violations != 'JA4 Fingerprint Reputation'" blackhole: 300s leakspeed: 5m capacity: -1 condition: | len(queue.Queue) > 10 and (count(queue.Queue, Atof(#.Meta.violation_rating) > 1) / len(queue.Queue)) > 0.9 groupby: "evt.Meta.ja4_fp" scope: type: ja4_fp expression: evt.Meta.ja4_fp labels: service: f5_waf type: waf_ja4 remediation: true debug: false There are a few key lines to call out from this configuration file. leakspeed: This is the "sliding window" within which we are looking for our "scenarios". i.e. events "leak" out of the bucket after 5 minutes. condition: The conditions under which I want to trigger this bucket. For my scenario, I have defined a condition of at least 10 events (with in that 5 minute window) AND where the total number of events, divided by the number of events where the violation rating is above 1, is greater than 0.9. in other words, if more than 90% of the requests have triggered a WAF violation with a rating higher than 1. filter: used to filter out events that you don't want to include in this scenario. In my case, I do not want to include requests where the only violation is the "JA4 Fingerprint Reputation" violation. groupby: this defines how I want to group requests. Typiiccally, in most CrowdSec scenarios this wil be some IP address field from the logs. In my scenario, I wanted to group by the JA4 fingerprint parsed out of the WAF logs. blackhole: this defines how long I want to "silence" alerts per JA4 fingerprint after this scenario has triggered. This prevents the same scenario from triggering repeatedly every time a new request comes into the bucket. scope: the scope is used by the reputation service to "categorize" alerts triggered by scenarios. the type field is used to define the type of data that is being reported. In most CrowdSec scenarios the type is "ip". In my case, I defined a custom type of "ja4_fp" with an "expression" (or value) of the JA4 fingerprint extracted from the WAF logs. Defining "Profiles" In the CrowdSec configuration "profiles" are used to define the remediation that should be taken when a scenario is triggered. I edited the /etc/crowdsec/profiles.yaml file to include the new profile for my JA4 scenario. name: ban_ja4_fp filters: - Alert.Remediation == true && Alert.GetScope() == "ja4_fp" decisions: - type: ban scope: "ja4_fp" duration: 5m debug: true on_success: continue --- ##### Everything below this point was already in the profiles.yaml file. Truncated here for brevity. name: default_ip_remediation #debug: true filters: - Alert.Remediation == true && Alert.GetScope() == "Ip" decisions: ... on_success: break Again, there are a few key lines from this configuration file. First, I only added a new profile named "ban_ja4_fp" with lines 1 through 9 in the file above. filters: Used to define which triggered scenarios should be included in this profile. In my case, all scenarios with the "remediation" label AND the "ja4_fp" scope. decisions: Used to define what type of remediation should be taken, for which "scope", and for how long. In my case, I chose the default of "ban", for the "ja4_fp" scope, and for 5 minutes. With this configuration in place I sent several malicious requests from my browser to my test application protected by the F5 Advanced WAF. I then checked the CrowdSec decisions list and voila! I had my browser's JA4 fingerprint listed! This was great but I wanted to be able to take action based on this intelligence in the F5 WAF. CrowdSec has the concept of "bouncers". Bouncers are devices the can take action on the remediation decisions generated by the SEs. Technically, anything that can call the local CrowdSec API and take some remediating action can be a bouncer. So, using the CLI on the CrowdSec SE, I defined a new "bouncer" for the F5 BIG-IP. ubuntu@xxxxxxxx:~$ sudo cscli bouncer add f5-bigip Api key for 'f5-bigip': xxxxxxxxxxxxxxxxxxxxxxxxxxxxxxxxxxxx Please keep this key since you will not be able to retrieve it! I knew that I could write an iRule that could call the SE API. However, the latency introduced by a sideband API call on EVERY HTTP request would just be completely untenable. I wanted a way to download the entire reputation list at a regular interval and store it on the F5 BIG-IP in a way that would be easily and efficiently accessible from the data plane. This sounded like a perfect job for an iCall script. Customizing the F5 BIG-IP Configuration If you are not familiar with iCall scripts, they are a programmatic way of checking or altering the F5 configuration based on some trigger; they are to the F5 BIG-IP management plane what iRules are to the data plane. The trigger can be some event, condition, log message, time interval, etc. I needed my iCall script to do two things. First, pull the reputation list from the CrowdSec SE. Second, store that list somewhere accessible to the F5 data plane. Like many of you, my first thought was either an iFile or a data group. Both of these are easily configurable components accessible via iCall scripts that are also accessible via iRules. For several reasons that I will not bother to detail here, I did not want to use either of these solutions, primarily for performance reasons (this reputation lookup needs to be very performant). And the most performant place to store information like this is the session table. The session table is accessible to iRules via "table" commands. However, the session table is not accessible via iCall scripts. At least not directly. I realized that I could send an HTTP request using the iCall script, AND that HTTP request could be to a local virtual server on the same BIG-IP where I could use an iRule to populate the session table with the JA4 reputation list pulled from the CrowdSec SE. The iCall Script From the F5 BIG-IP CLI I created the following iCall script using the tmsh command 'tmsh create sys icall script crowdsec_ja4_rep_update': sys icall script crowdsec_ja4_rep_update { app-service none definition { package require http set csapi_resp [http::geturl http://10.0.2.240:8080/v1/decisions/stream?startup=true&scopes=ja4_fp -headers "X-api-Key 1a234xxxxxxxxxxxxxxe56fab7"] #tmsh::log "[http::data ${csapi_resp}]" set payload [http::data ${csapi_resp}] http::cleanup ${csapi_resp} set tupdate_resp [http::geturl http://10.0.1.110/updatetables -type "application/json" -query ${payload}] tmsh::log "[http::data ${tupdate_resp}]" http::cleanup ${tupdate_resp} } description none events none } Let's dig through this iCall script line by line: 4. Used to "require" or "include" the TCL http library. 5. HTTP request to the CrowdSec API to get the JA4 reputation list. 10.0.2.240:8080 is the IP:port of the CrowdSec SE API /v1/decisions/stream is the API endpoint used to grab an entire reputation list (rather than just query for the status of an individual IP/JA4) startup=true tells the API to send the entire list, not just additions/deletions since the last API call scopes=ja4_fp limits the returned results to just JA4 fingerprint-type decisions -headers "X-api-Key xxxxxxxxxxxxxxxxxxxxxxxxxx" includes the API key generated previously to authenticate the F5 BIG-IP as a "bouncer" 7. Store just the body of the API response in a variable called "payload" 8. free up memory used by the HTTP request tot eh CrowdSec API 9. HTTP Request to a local virtual server (on the same F5 BIG-IP) including the contents of the "payload" variable as the POST body. The IP address needs to be the IP address of the virtual server defined in the next step. An iRule will be created and placed on this virtual server that parses the "payload" and inserts the JA4 reputation list into the session table. An iCall script will not run unless an iCall handler is created that defines when that iCall script should run. I call handlers can be "triggered", "perpetual", or "periodic". I created the following periodic iCall handler to run this iCall script at regular intervals. sys icall handler periodic crowdsec-api-ja4 { interval 30 script crowdsec_ja4_list } This iCall handler is very simple; it has an "interval" for how often you want to run the script and the script that you want to run. I chose to run the iCall script every 30 seconds so that the BIGIP session table would be updated with any new malicious JA4 fingerprints very quickly. But you could choose to run the iCall script every 1 minute, 5 minutes, etc. The Table Updater Virtual Server and iRule I then created a HTTP virtual server with no pool associated to it. This virtual server exists solely to accept and process the HTTP requests from the iCall script. I then created the following iRule to process the requests and payload from the iCall script: proc duration2seconds {durstr} { set h 0 set m 0 set s 0 regexp {(\d+)h} ${durstr} junk h regexp {(\d+)m} ${durstr} junk m regexp {(\d+)\.} ${durstr} junk s set seconds [expr "(${h}*3600) + (${m}*60) + ${s}"] return $seconds } when HTTP_REQUEST { if { ([HTTP::uri] eq "/updatetables" || [HTTP::uri] eq "/lookuptables") && [HTTP::method] eq "POST"} { HTTP::collect [HTTP::header value "content-length"] } else { HTTP::respond 404 } } when HTTP_REQUEST_DATA { #log local0. "PAYLOAD: '[HTTP::payload]'" regexp {"deleted":\[([^\]]+)\]} [HTTP::payload] junk cs_deletes regexp {"new":\[([^\]]+)\]} [HTTP::payload] junk cs_adds if { ![info exists cs_adds] } { HTTP::respond 200 content "NO NEW ENTRIES" return } log local0. "CS Additions: '${cs_adds}'" set records [regexp -all -inline -- {\{([^\}]+)\},?} ${cs_adds}] set update_list [list] foreach {junk record} $records { set urec "" foreach k {scope value type scenario duration} { set v "" regexp -- "\"${k}\":\"?(\[^\",\]+)\"?,?" ${record} junk v log local0. "'${k}': '${v}'" if { ${k} eq "duration" } { set v [call duration2seconds ${v}] } append urec "${v}:" } set urec [string trimright ${urec} ":"] #log local0. "$urec" lappend update_list ${urec} } set response "" foreach entry $update_list { scan $entry {%[^:]:%[^:]:%[^:]:%[^:]:%s} scope entity type scenario duration if { [HTTP::uri] eq "/updatetables" } { table set "${scope}:${entity}" "${type}:${scenario}" indefinite $duration append response "ADDED ${scope}:${entity} FOR ${duration} -- " } elseif { [HTTP::uri] eq "/lookuptables" } { set remaining "" set action "" if { [set action [table lookup ${scope}:${entity}]] ne "" } { set remaining [table lifetime -remaining ${scope}:${entity}] append response "${scope}:${entity} - ${action} - ${remaining}s remaining\r\n" } else { append response "${scope}:${entity} - NOT IN TABLE\r\n" } } } HTTP::respond 200 content "${response}" } I have attempted to include sufficient inline comments so that the iRule is self-explanatory. If you have any questions or comments on this iRule please feel free to DM me. It is important to note here that the iRule is storing not only each JA4 fingerprint in the session table as a key but also the metadata passed back from the CrowdSec API about each JA4 reputation as the value for each key. This metadata includes the scenario name, the "type" or action, and the duration. So at this point I had a JA4 reputation list, updated continuously based on the WAF violation logs and CrowdSec scenarios. I also had an iCall script on the F5 BIG-IP that was pulling that reputation list via the local CrowdSec API every 30 seconds and pushing that reputation list into the local session table on the BIG-IP. Now I just needed to take some action based on that reputation list. Integrating JA4 Reputation into F5 WAF To integrate the JA4 reputation into the F5 Advanced WAF we only need two things: a custom violation defined in the WAF an iRule to lookup the JA4 in the local session table and raise that violation Creating a Custom Violation Creating a custom violation in F5 Advanced WAF (or ASM) will vary slightly depending on which version of the TMOS software you are running. In version 17.1 it is at Security ›› Options : Application Security : Advanced Configuration : Violations List. Select the User-Defined Violations tab and click Create. Give the Violation a Title and define the Type, Severity, and Attack Type. Finally, I modified the Learning and Blocking Settings of my policy to ensure that the new custom violation was set to Alarm and Block. F5 iRule for Custom Violation I then created the following iRule to raise this new custom WAF violation if the JA4 fingerprint is found in the reputation list in the local session table. when ASM_REQUEST_DONE { # Grab JA4 fingerprint from x-ja4 header # This header is inserted by the JA4 irule set ja4_fp [HTTP::header value "x-ja4"] # Lookup JA4 fingerprint in session table if { [set result [table lookup "ja4_fp:${ja4_fp}"]] ne "" } { # JA4 was found in session table, scan the value to get "category" and "action" scan ${result} {%[^:]:%s} action category # Initialize all the nested list of lists format required for the # violation details of the ASM::raise command set viol [] set viol_det1 [] set viol_det2 [] set viol_det3 [] # Populate the variables with values parsed from the session table for this JA4 lappend viol_det1 "JA4 FP" "${ja4_fp}" lappend viol_det2 "CrowdSec Category" "${category}" lappend viol_det3 "CrowdSec Action" "${action}" lappend viol ${viol_det1} ${viol_det2} ${viol_det3} # Raise custom ASM violation with violation details ASM::raise VIOL_JA4_REPUTATION ${viol} } } Again, I tried to include enough inline documentation for the iRule to be self-explanatory. Seeing It All In Action With everything in place, I sent several requests, most malicious and some benign, to the application protected by the F5 Advanced WAF. Initially, only the malicious requests were blocked. After about 60 seconds, ALL of the requests were being blocked due to the new custom violation based on JA4 reputation. Below is a screenshot from one of my honeypot WAF instances blocking real "in-the-wild" traffic based on JA4 reputation. Note that the WAF violation includes (1) the JA4 fingerprint, (2) the "category" (or scenario), and (3) the "action" (or type). Things to Note The API communication between the F5 BIG-IP and the CrowdSec SE is over HTTP. This is obviously insecure; for this proof-of-concept deployment I was just too lazy to spend the extra time to get signed certs on all the devices involved and alter the iCall script to use the TCL SSL library.362Views5likes0CommentsINFORM: Entrust CA will be untrusted in Chrome after Oct 31, 2024
If you manage certs from Entrust in your environment, this will impact your Google Chrome users, so intermediate certs will likely need to be bundled to handle this in your clientssl profiles OR if you control all the clients you can assure that explicit trust in the clients is enabled for Entrust CAs. Google details on the situation46Views0likes0Comments
SSL cert bundle - how to extract the intermediate?
We have a new cert provider and instead of sending me a zip file with the cert and intermediate, they sent the cert and a bundle. Any idea how to extract the intermediate cert text from that bundle so I can import into the F5 and use with an SSL profile? Thanks!Solved54Views0likes4Comments
SSL protocol mismatch
Ok, I ended up way down a rabbit hole earlier this week. That whole line of thought seemed to be a red herring. BigIP LTM trying to load balance to MS Navision servers which don't use standard 80 or 443 ports. Instead, the client communicates on port 7246 using TLSv1.2. If I have my Virtual Server Type set to "Performance (Layer 4)" I can get a connection to the Navision servers without issue. However I want to get SSL Bridging set up because I think we can get better performance with SSL Bridging than just the SSL passthrough (which I believe is basically what the"Performance (Layer 4)" is). When I try to set the type to "standard" (without puting in a client or server ssl profile) the Navision client gives me a "could not create a connection to the server". I've imported our wildcard cert and if I set the Wildcard cert for the SSL Profile (Client) and set the SSL Profile (Server) to "serverssl" I then get a "can't connect because of a protocol mismatch". Checking tmm --clientciphers DEFAULT | grep "TLS1.2" returns a bunch of TLS1.2 protocols and the Wildcard profile is set to "Ciphers Default". Checking the LTM log, I just get kind of a generic error Oct 4 15:45:20 BigIP01.domain.com warning tmm1[3124]: 01260009:4: <client IP>:43130 -> <BigIP VS IP>:7246: Connection error: ssl_passthru:5935: alert(40) not SSL Now, according to wireshark, I'm seeing both TLS and non TLS traffic to port 7246 so I'm not sure if the above error is a "real" error or if the issue is because both kinds of traffic are going to the same port. Logging on my SSL certificate is set to "debug" for all events. I'm not sure where to go next. ltm profile client-ssl Wildcard23-24 { ciphers DEFAULT } ltm profile server-ssl serverssl { ciphers DEFAULT } pool Nav_Pool_7246 profiles { LC-http { } LC-oneconnect { } LC-tcp-lan { } Wildcard23-24 { context clientside } serverssl { context serverside } } serverssl-use-sni disabled source 0.0.0.0/0 source-address-translation { pool Nav type snat } translate-address enabled translate-port enabled vs-index 4 }Solved1.5KViews0likes13CommentsSSL Profiles Part 8: Client Authentication
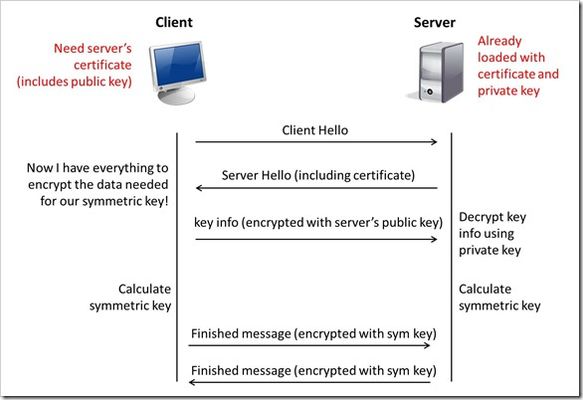
This is the eighth article in a series of Tech Tips that highlight SSL Profiles on the BIG-IP LTM. SSL Overview and Handshake SSL Certificates Certificate Chain Implementation Cipher Suites SSL Options SSL Renegotiation Server Name Indication Client Authentication Server Authentication All the "Little" Options This article will discuss the concept of Client Authentication, how it works, and how the BIG-IP system allows you to configure it for your environment. Client Authentication In a TLS handshake, the client and the server exchange several messages that ultimately result in an encrypted channel for secure communication. During this handshake, the client authenticates the server's identity by verifying the server certificate (for more on the TLS handshake, see SSL Overview and Handshake - Article 1in this series). Although the client always authenticates the server's identity, the server is not required to authenticate the client's identity. However, there are some situations that call for the server to authenticate the client. Client authentication is a feature that lets you authenticate users that are accessing a server. In client authentication, a certificate is passed from the client to the server and is verified by the server. Client authentication allow you to rest assured that the person represented by the certificate is the person you expect. Many companies want to ensure that only authorized users can gain access to the services and content they provide. As more personal and access-controlled information moves online, client authentication becomes more of a reality and a necessity. How Does Client Authentication Work? Before we jump into client authentication, let's make sure we understand server authentication. During the TLS handshake, the client authenticates the identity of the server by verifying the server's certificate and using the server's public key to encrypt data that will be used to compute the shared symmetric key. The server can only generate the symmetric key used in the TLS session if it can decrypt that data with its private key. The following diagram shows an abbreviated version of the TLS handshake that highlights some of these concepts. Ultimately, the client and server need to use a symmetric key to encrypt all communication during their TLS session. In order to calculate that key, the server shares its certificate with the client (the certificate includes the server's public key), and the client sends a random string of data to the server (encrypted with the server's public key). Now that the client and server each have the random string of data, they can each calculate (independently) the symmetric key that will be used to encrypt all remaining communication for the duration of that specific TLS session. In fact, the client and server both send a "Finished' message at the end of the handshake...and that message is encrypted with the symmetric key that they have both calculated on their own. So, if all that stuff works and they can both read each other's "Finished" message, then the server has been authenticated by the client and they proceed along with smiles on their collective faces (encrypted smiles, of course). You'll notice in the diagram above that the server sent its certificate to the client, but the client never sent its certificate to the server. When client authentication is used, the server still sends its certificate to the client, but it also sends a "Certificate Request" message to the client. This lets the client know that it needs to get its certificate ready because the next message from the client to the server (during the handshake) will need to include the client certificate. The following diagram shows the added steps needed during the TLS handshake for client authentication. So, you can see that when client authentication is enabled, the public and private keys are still used to encrypt and decrypt critical information that leads to the shared symmetric key. In addition to the public and private keys being used for authentication, the client and server both send certificates and each verifies the certificate of the other. This certificate verification is also part of the authentication process for both the client and the server. The certificate verification process includes four important checks. If any of these checks do not return a valid response, the certificate verification fails (which makes the TLS handshake fail) and the session will terminate. These checks are as follows: Check digital signature Check certificate chain Check expiration date and validity period Check certificate revocation status Here's how the client and server accomplish each of the checks for client authentication: Digital Signature: The client sends a "Certificate Verify" message that contains a digitally signed copy of the previous handshake message. This message is signed using the client certificate's private key. The server can validate the message digest of the digital signature by using the client's public key (which is found in the client certificate). Once the digital signature is validated, the server knows that public key belonging to the client matches the private key used to create the signature. Certificate Chain: The server maintains a list of trusted CAs, and this list determines which certificates the server will accept. The server will use the public key from the CA certificate (which it has in its list of trusted CAs) to validate the CA's digital signature on the certificate being presented. If the message digest has changed or if the public key doesn't correspond to the CA's private key used to sign the certificate, the verification fails and the handshake terminates. Expiration Date and Validity Period: The server compares the current date to the validity period listed in the certificate. If the expiration date has not passed and the current date is within the period, everything is good. If it's not, then the verification fails and the handshake terminates. Certificate Revocation Status: The server compares the client certificate to the list of revoked certificates on the system. If the client certificate is on the list, the verification fails and the handshake terminates. As you can see, a bunch of stuff has to happen in just the right way for the Client-Authenticated TLS handshake to finalize correctly. But, all this is in place for your own protection. After all, you want to make sure that no one else can steal your identity and impersonate you on a critically important website! BIG-IP Configuration Now that we've established the foundation for client authentication in a TLS handshake, let's figure out how the BIG-IP is set up to handle this feature. The following screenshot shows the user interface for configuring Client Authentication. To get here, navigate to Local Traffic > Profiles > SSL > Client. The Client Certificate drop down menu has three settings: Ignore (default), Require, and Request. The "Ignore" setting specifies that the system will ignore any certificate presented and will not authenticate the client before establishing the SSL session. This effectively turns off client authentication. The "Require" setting enforces client authentication. When this setting is enabled, the BIG-IP will request a client certificate and attempt to verify it. An SSL session is established only if a valid client certificate from a trusted CA is presented. Finally, the "Request" setting enables optional client authentication. When this setting is enabled, the BIG-IP will request a client certificate and attempt to verify it. However, an SSL session will be established regardless of whether or not a valid client certificate from a trusted CA is presented. The Request option is often used in conjunction with iRules in order to provide selective access depending on the certificate that is presented. For example: let's say you would like to allow clients who present a certificate from a trusted CA to gain access to the application while clients who do not provide the required certificate be redirected to a page detailing the access requirements. If you are not using iRules to enforce a different outcome based on the certificate details, there is no significant benefit to using the "Request" setting versus the default "Ignore" setting. In both cases, an SSL session will be established regardless of the certificate presented. Frequency specifies the frequency of client authentication for an SSL session. This menu offers two options: Once (default) and Always. The "Once" setting specifies that the system will authenticate the client only once for an SSL session. The "Always"setting specifies that the system will authenticate the client once when the SSL session is established as well as each time that session is reused. The Retain Certificate box is checked by default. When checked, the client certificate is retained for the SSL session. Certificate Chain Traversal Depth specifies the maximum number of certificates that can be traversed in a client certificate chain. The default for this setting is 9. Remember that "Certificate Chain" part of the verification checks? This setting is where you configure the depth that you allow the server to dig for a trusted CA. For more on certificate chains, see article 2 of this SSL series. Trusted Certificate Authorities setting is used to specify the BIG-IP's Trusted Certificate Authorities store. These are the CAs that the BIG-IP trusts when it verifies a client certificate that is presented during client authentication. The default value for the Trusted Certificate Authorities setting is None, indicating that no CAs are trusted. Don't forget...if the BIG-IP Client Certificate menu is set to Require but the Trusted Certificate Authorities is set to None, clients will not be able to establish SSL sessions with the virtual server. The drop down list in this setting includes the name of all the SSL certificates installed in the BIG-IP's /config/ssl/ssl.crt directory. A newly-installed BIG-IP system will include the following certificates: default certificate and ca-bundle certificate. The default certificate is a self-signed server certificate used when testing SSL profiles. This certificate is not appropriate for use as a Trusted Certificate Authorities certificate bundle. The ca-bundle certificate is a bundle of CA certificates from most of the well-known PKIs around the world. This certificate may be appropriate for use as a Trusted Certificate Authorities certificate bundle. However, if this bundle is specified as the Trusted Certificate Authorities certificate store, any valid client certificate that is signed by one of the popular Root CAs included in the default ca-bundle.crt will be authenticated. This provides some level of identification, but it provides very little access control since almost any valid client certificate could be authenticated. If you want to trust only certificates signed by a specific CA or set of CAs, you should create and install a bundle containing the certificates of the CAs whose certificates you trust. The bundle must also include the entire chain of CA certificates necessary to establish a chain of trust. Once you create this new certificate bundle, you can select it in the Trusted Certificate Authorities drop down menu. The Advertised Certificate Authorities setting is used to specify the CAs that the BIG-IP advertises as trusted when soliciting a client certificate for client authentication. The default value for the Advertised Certificate Authorities setting is None, indicating that no CAs are advertised. When set to None, no list of trusted CAs is sent to a client with the certificate request. If the Client Certificate menu is set to Require or Request, you can configure the Advertised Certificate Authorities setting to send clients a list of CAs that the server is likely to trust. Like the Trusted Certificate Authorities list, the Advertised Certificate Authorities drop down list includes the name of all the SSL certificates installed in the BIG-IP /config/ssl/ssl.crt directory. A newly-installed BIG-IP system includes the following certificates: default certificate and ca-bundle certificate. The default certificate is a self-signed server certificate used for testing SSL profiles. This certificate is not appropriate for use as an Advertised Certificate Authorities certificate bundle. The ca-bundle certificate is a bundle of CA certificates from most of the well-known PKIs around the world. This certificate may be appropriate for use as an Advertised Certificate Authorities certificate bundle. If you want to advertise only a specific CA or set of CAs, you should create and install a bundle containing the certificates of the CA to advertise. Once you create this new certificate bundle, you can select it in the Advertised Certificate Authorities setting drop down menu. You are allowed to configure the Advertised Certificate Authorities setting to send a different list of CAs than that specified for the Trusted Certificate Authorities. This allows greater control over the configuration information shared with unknown clients. You might not want to reveal the entire list of trusted CAs to a client that does not automatically present a valid client certificate from a trusted CA. Finally, you should avoid specifying a bundle that contains a large number of certificates when you configure the Advertised Certificate Authorities setting. This will cut down on the number of certificates exchanged during a client SSL handshake. The maximum size allowed by the BIG-IP for native SSL handshake messages is 14,304 bytes. Most handshakes don't result in large message lengths, but if the SSL handshake is negotiating a native cipher and the total length of all messages in the handshake exceeds the 14,304 byte threshold, the handshake will fail. The Certificate Revocation List (CRL) setting allows you to specify a CRL that the BIG-IP will use to check revocation status of a certificate prior to authenticating a client. If you want to use a CRL, you must upload it to the /config/ssl/ssl.crl directory on the BIG-IP. The name of the CRL file may then be entered in the CRL setting dialog box. Note that this box will offer no drop down menu options until you upload a CRL file to the BIG-IP. Since CRLs can quickly become outdated, you should use either OCSP or CRLDP profiles for more robust and current verification functionality. Conclusion Well, that wraps up our discussion on Client Authentication. I hope the information helped, and I hope you can use this to configure your BIG-IP to meet the needs of your specific network environment. Be sure to come back for our next article in the SSL series. As always, if you have any other questions, feel free to post a question here or Contact Us directly. See you next time!24KViews1like21Comments
TLS server_name extension based routing without clientssl profile
Problem this snippet solves: Some configuration requires to not decrypt SSL traffic on F5 appliances to select pool based on HTTP Host header. I found a useful irule and this code keeps the structure and most of binary commands of it. I'm not sure if the first author was Kevin Stewart or Colin Walker. thanks both of them to have provided such code. I worked to understand it reading TLS 1.2 RFC 5246 and TLS 1.3 draft-23 and provided some enhancements and following description with irule variables references. According to TLS 1.3 draft-23, this code will still be valid with next TLS version. the following network diagram shows one use cases where this code will help. This diagram show how this code works based on the tls_servername_routing_dg Datagroup values and detected server name and TLS versions detected in the CLIENT_HELLO packet. For performances reasons, only the first TCP data packet is analyzed. Versions : 1.1 : Updated to support TLS version detection and SSL offload feature. (05/03/2018) 1.2 : Updated to support TLS Handshake Failure Messages instead of reject. (09/03/2018) 1.3 : Updated to support node forwarding, logs only for debug (disabled with static variable), and changed the Datagroup name to tls_servername_routing_dg . (16/03/2018) 1.4 : Added 16K handshake length limit defined in RFC 1.2 in variable payload. (13/04/2018) 1.5 : Added supported version extension recursion, to bypass unknown TLS version if a known and allowed version is in the list. This correct an issue with Google chrome which include not documented TLS version on top of the list. (30/04/2018) How to use this snippet: create a virtual server with following configuration: type : Standard SSL Profile (client) : Only if you want to enable SSL offload for some pools irule : code bellow create all objects used in following datagroup (virtual servers, pools) create a data-group named tls_servername_routing_dg. if you want to forward to pool, add the value pool NameOfPool if you want to forward to pool and enable SSL Offload (ClientSSL profile must be enabled on virtual server), add the value pool NameOfPool ssl_offload if you want to forward to virtual server, add the value virtual NameOfVirtual if you want to forward to an IP address, add the value node IPOfServer , backend server will not be translated if you want to reject the connection with RFC compliant handshake_failure message, add the value handshake_failure if you want to reject the connection, add the value reject if you want to drop the connection, add the value drop The default value keyword is search if there is no TLS server name extension or if TLS server name extension is not found in the data group. here is an example: ltm data-group internal tls_servername_routing_dg { records { app1.company.com { data "virtual vs_app1.company.com" } app2.company.com { data "pool p_app2" } app3.company.com { data "pool p_app3 ssl_offload" } app4.company.com { reject } default { data "handshake_failure" } } type string } Code : when RULE_INIT { set static::sni_routing_debug 0 } when CLIENT_ACCEPTED { if { [PROFILE::exists clientssl] } { # We have a clientssl profile attached to this VIP but we need # to find an SNI record in the client handshake. To do so, we'll # disable SSL processing and collect the initial TCP payload. set ssldisable "SSL::disable" set sslenable "SSL::enable" eval $ssldisable } TCP::collect set default_pool [LB::server pool] set tls_servername "" set tls_handshake_prefered_version "0000" } when CLIENT_DATA { # Store TCP Payload up to 2^14 + 5 bytes (Handshake length is up to 2^14) set payload [TCP::payload 16389] set payloadlen [TCP::payload length] # - Record layer content-type (1 byte) --> variable tls_record_content_type # Handshake value is 22 (required for CLIENT_HELLO packet) # - SSLv3 / TLS version. (2 byte) --> variable tls_version # SSLv3 value is 0x0300 (doesn't support SNI, not valid in first condition) # TLS_1.0 value is 0x0301 # TLS_1.1 value is 0x0302, 0x0301 in CLIENT_HELLO handskake packet for backward compatibility (not specified in RFC, that's why the value 0x0302 is allowed in condition) # TLS_1.2 value is 0x0303, 0x0301 in CLIENT_HELLO handskake packet for backward compatibility (not specified in RFC, that's why the value 0x0303 is allowed in condition) # TLS_1.3 value is 0x0304, 0x0301 in CLIENT_HELLO handskake packet for backward compatibility (explicitly specified in RFC) # TLS_1.3 drafts values are 0x7FXX (XX is the hexadecimal encoded draft version), 0x0301 in CLIENT_HELLO handskake packet for backward compatibility (explicitly specified in RFC) # - Record layer content length (2 bytes) : must match payload length --> variable tls_recordlen # - TLS Hanshake protocol (length defined by Record layer content length value) # - Handshake action (1 byte) : CLIENT_HELLO = 1 --> variable tls_handshake_action # - handshake length (3 bytes) # - SSL / TLS handshake version (2 byte) # In TLS 1.3 CLIENT_HELLO handskake packet, TLS hanshake version is sent whith 0303 (TLS 1.2) version for backward compatibility. a new TLS extension add version negociation. # - hanshake random (32 bytes) # - handshake sessionID length (1 byte) --> variable tls_handshake_sessidlen # - handshake sessionID (length defined by sessionID length value, max 32-bit) # - CipherSuites length (2 bytes) --> variable tls_ciphlen # - CipherSuites (length defined by CipherSuites length value) # - Compression length (2 bytes) --> variable tls_complen # - Compression methods (length defined by Compression length value) # - Extensions # - Extension length (2 bytes) --> variable tls_extension_length # - list of Extensions records (length defined by extension length value) # - extension record type (2 bytes) : server_name = 0, supported_versions = 43--> variable tls_extension_type # - extension record length (2 bytes) --> variable tls_extension_record_length # - extension data (length defined by extension record length value) # # TLS server_name extension data format: # - SNI record length (2 bytes) # - SNI record data (length defined by SNI record length value) # - SNI record type (1 byte) # - SNI record value length (2 bytes) # - SNI record value (length defined by SNI record value length value) --> variable tls_servername # # TLS supported_version extension data format (added in TLS 1.3): # - supported version length (1 bytes) --> variable tls_supported_versions_length # - List of supported versions (2 bytes per version) --> variable tls_supported_versions # If valid TLS 1.X CLIENT_HELLO handshake packet if { [binary scan $payload cH4Scx3H4x32c tls_record_content_type tls_version tls_recordlen tls_handshake_action tls_handshake_version tls_handshake_sessidlen] == 6 && \ ($tls_record_content_type == 22) && \ ([string match {030[1-3]} $tls_version]) && \ ($tls_handshake_action == 1) && \ ($payloadlen == $tls_recordlen+5)} { # store in a variable the handshake version set tls_handshake_prefered_version $tls_handshake_version # skip past the session id set record_offset [expr {44 + $tls_handshake_sessidlen}] # skip past the cipher list binary scan $payload @${record_offset}S tls_ciphlen set record_offset [expr {$record_offset + 2 + $tls_ciphlen}] # skip past the compression list binary scan $payload @${record_offset}c tls_complen set record_offset [expr {$record_offset + 1 + $tls_complen}] # check for the existence of ssl extensions if { ($payloadlen > $record_offset) } { # skip to the start of the first extension binary scan $payload @${record_offset}S tls_extension_length set record_offset [expr {$record_offset + 2}] # Check if extension length + offset equals payload length if {$record_offset + $tls_extension_length == $payloadlen} { # for each extension while { $record_offset < $payloadlen } { binary scan $payload @${record_offset}SS tls_extension_type tls_extension_record_length if { $tls_extension_type == 0 } { # if it's a servername extension read the servername # SNI record value start after extension type (2 bytes), extension record length (2 bytes), record type (2 bytes), record type (1 byte), record value length (2 bytes) = 9 bytes binary scan $payload @[expr {$record_offset + 9}]A[expr {$tls_extension_record_length - 5}] tls_servername set record_offset [expr {$record_offset + $tls_extension_record_length + 4}] } elseif { $tls_extension_type == 43 } { # if it's a supported_version extension (starting with TLS 1.3), extract supported version in a list binary scan $payload @[expr {${record_offset} + 4}]cS[expr {($tls_extension_record_length -1)/2}] tls_supported_versions_length tls_supported_versions set tls_handshake_prefered_version [list] foreach version $tls_supported_versions { lappend tls_handshake_prefered_version [format %04X [expr { $version & 0xffff }] ] } if {$static::sni_routing_debug} {log local0. "[IP::remote_addr] : prefered version list : $tls_handshake_prefered_version"} set record_offset [expr {$record_offset + $tls_extension_record_length + 4}] } else { # skip over other extensions set record_offset [expr {$record_offset + $tls_extension_record_length + 4}] } } } } } elseif { [binary scan $payload cH4 ssl_record_content_type ssl_version] == 2 && \ ($tls_record_content_type == 22) && \ ($tls_version == 0300)} { # SSLv3 detected set tls_handshake_prefered_version "0300" } elseif { [binary scan $payload H2x1H2 ssl_version handshake_protocol_message] == 2 && \ ($ssl_version == 80) && \ ($handshake_protocol_message == 01)} { # SSLv2 detected set tls_handshake_prefered_version "0200" } unset -nocomplain payload payloadlen tls_record_content_type tls_recordlen tls_handshake_action tls_handshake_sessidlen record_offset tls_ciphlen tls_complen tls_extension_length tls_extension_type tls_extension_record_length tls_supported_versions_length tls_supported_versions foreach version $tls_handshake_prefered_version { switch -glob -- $version { "0200" { if {$static::sni_routing_debug} {log local0. "[IP::remote_addr] : SSLv2 ; connection is rejected"} reject return } "0300" - "0301" { if {$static::sni_routing_debug} {log local0. "[IP::remote_addr] : SSL/TLS ; connection is rejected (0x$version)"} # Handshake Failure packet format: # # - Record layer content-type (1 byte) --> variable tls_record_content_type # Alert value is 21 (required for Handshake Failure packet) # - SSLv3 / TLS version. (2 bytes) --> from variable tls_version # - Record layer content length (2 bytes) : value is 2 for Alert message # - TLS Message (length defined by Record layer content length value) # - Level (1 byte) : value is 2 (fatal) # - Description (1 bytes) : value is 40 (Handshake Failure) TCP::respond [binary format cH4Scc 21 $tls_version 2 2 40] after 10 TCP::close #drop #reject return } "030[2-9]" - "7F[0-9A-F][0-9A-F]" { # TLS version allowed, do nothing break } "0000" { if {$static::sni_routing_debug} {log local0. "[IP::remote_addr] : No SSL/TLS protocol detected ; connection is rejected (0x$version)"} reject return } default { if {$static::sni_routing_debug} {log local0. "[IP::remote_addr] : Unknown CLIENT_HELLO TLS handshake prefered version : 0x$version"} } } } if { $tls_servername equals "" || ([set sni_dg_value [class match -value [string tolower $tls_servername] equals tls_servername_routing_dg]] equals "")} { set sni_dg_value [class match -value "default" equals tls_servername_routing_dg] } switch [lindex $sni_dg_value 0] { "virtual" { if {[catch {virtual [lindex $sni_dg_value 1]}]} { if {$static::sni_routing_debug} {log local0. "[IP::remote_addr] : TLS server_name value = ${tls_servername} ; TLS prefered version = 0x${tls_handshake_prefered_version} ; Virtual server [lindex $sni_dg_value 1] doesn't exist"} } else { if {$static::sni_routing_debug} {log local0. "[IP::remote_addr] : TLS server_name value = ${tls_servername} ; TLS prefered version = 0x${tls_handshake_prefered_version} ; forwarded to Virtual server [lindex $sni_dg_value 1]"} } } "pool" { if {[catch {pool [lindex $sni_dg_value 1]}]} { if {$static::sni_routing_debug} {log local0. "[IP::remote_addr] : TLS server_name value = ${tls_servername} ; TLS prefered version = 0x${tls_handshake_prefered_version} ; Pool [lindex $sni_dg_value 1] doesn't exist"} } else { if {$static::sni_routing_debug} {log local0. "[IP::remote_addr] : TLS server_name value = ${tls_servername} ; TLS prefered version = 0x${tls_handshake_prefered_version} ; forwarded to Pool [lindex $sni_dg_value 1]"} } if {[lindex $sni_dg_value 2] equals "ssl_offload" && [info exists sslenable]} { eval $sslenable } } "node" { if {[catch {node [lindex $sni_dg_value 1]}]} { if {$static::sni_routing_debug} {log local0. "[IP::remote_addr] : TLS server_name value = ${tls_servername} ; TLS prefered version = 0x${tls_handshake_prefered_version} ; Invalid Node value [lindex $sni_dg_value 1]"} } else { if {$static::sni_routing_debug} {log local0. "[IP::remote_addr] : TLS server_name value = ${tls_servername} ; TLS prefered version = 0x${tls_handshake_prefered_version} ; forwarded to Node [lindex $sni_dg_value 1]"} } } "handshake_failure" { if {$static::sni_routing_debug} {log local0. "[IP::remote_addr] : TLS server_name value = ${tls_servername} ; TLS prefered version = 0x${tls_handshake_prefered_version} ; connection is rejected (with Handshake Failure message)"} TCP::respond [binary format cH4Scc 21 $tls_handshake_prefered_version 2 2 40] after 10 TCP::close return } "reject" { if {$static::sni_routing_debug} {log local0. "[IP::remote_addr] : TLS server_name value = ${tls_servername} ; TLS prefered version = 0x${tls_handshake_prefered_version} ; connection is rejected"} reject return } "drop" { if {$static::sni_routing_debug} {log local0. "[IP::remote_addr] : TLS server_name value = ${tls_servername} ; TLS prefered version = 0x${tls_handshake_prefered_version} ; connection is dropped"} drop return } } TCP::release }3.4KViews6likes10Comments
Dynamic CRL Check with Client SSL Profile - How to notify the user?
Hi, we have implemented dynamic CRL checking with client SSL profile in our test environment with BIG-IP 15.1. And it works. If a test user tries to establish a SSL session to a VIP with dynamic CRL checking enabled and the user's cert is revoked, the BIG-IP resets the connection. We are looking for a wayto direct the user's browser to an error page so that the user would be notified that the application can't be accessed because the cert is revoked. Obviously, SSL session is (or not) established before any traffic can be sent over HTTP. We can verify CRL check result with "SSL::verify_result" in an iRule (for example), but the session is reset before an HTTP redirect can be sent. We are aware that this can be done with LTM + APM, however for this use case the APM is not available. This was, for example, possible in the "old days" on Cisco ACE with: parameter-map type sslMap_Name authentication-failure redirect cert-revoked url URL_Address Any ideas & help on how to notify the user that the cert has been revoked greatly appreciated. Thanks!Solved71Views0likes2CommentsLet's Encrypt
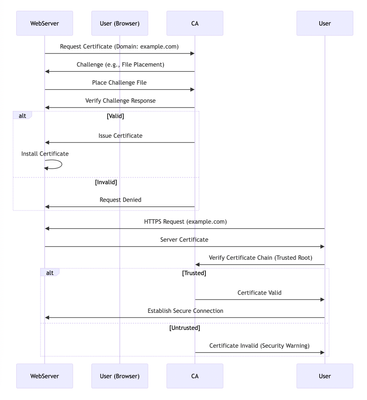
Let's Encrypt has revolutionized the way website owners implement HTTPS by offering free and automated SSL certificates, making secure connections accessible to everyone. This article delves into the technical aspects of Let's Encrypt, explaining how it establishes trust and secures your website. Before diving into Let's Encrypt, it's essential to understand the role of a Certificate Authority (CA). CAs are trusted entities that verify domain ownership and issue SSL certificates. They form the foundation of the Public Key Infrastructure (PKI) that enables secure communication on the internet. The Role of a Certificate Authority (CA): The process begins when a web server requests a certificate from the CA, specifying the domain name. The CA sends a challenge to validate the server's control over the domain. Upon successful validation, the CA issues an X.509/SSL/TLS certificate, which the server installs. When a user visits the website, their browser verifies the certificate's authenticity by checking the chain of trust back to a trusted root certificate. If the chain is valid, a secure connection is established. A critical role in this ecosystem is played by Certificate Authorities (CAs). CAs are trusted third-party entities responsible for: Domain Validation:CAs employ various mechanisms to validate the ownership or control of a domain name by the entity requesting the certificate. This validation process helps mitigate phishing attacks and ensures certificates are issued to legitimate entities. Public Key Infrastructure (PKI) Management:CAs operate within a Public Key Infrastructure (PKI) framework. They maintain a repository of trusted root certificates and issue intermediate certificates signed by a trusted root. Website administrators generate a public/private key pair, and the CA signs a certificate binding the public key to the validated domain identity. This signed certificate, containing the public key and domain information, is then installed on the web server. Trust Chain Establishment:Web browsers and operating systems come pre-loaded with a set of trusted root certificates issued by well-known CAs. When a user visits a website with a valid SSL/TLS certificate, the browser can verify the certificate's authenticity by chaining it back to a trusted root certificate, establishing a secure connection. This sequence below shows the role of a CA in the certificate issuance and validation process: Traditionally, obtaining certificates from CAs involved a manual enrollment process and significant costs. Let's Encrypt disrupted this model by offering free certificates through an automated process using the Automated Certificate Management Environment (ACME) protocol. ACME streamlines communication between web servers and the CA, automating the entire certificate lifecycle, including issuance and renewal. Let's Encrypt certificates have a short 90-day validity period to enhance security, and the automation ensures seamless renewal before expiration. This sequence shows the steps involved in obtaining a Let's Encrypt SSL/TLS certificate for a web server. Here's a breakdown: Requesting a Certificate:The web server software initiates the process by sending a request to Let's Encrypt CA, asking for a certificate. Challenge for Validation:Let's Encrypt CA responds by sending the web server a challenge. This challenge is designed to verify that the software requesting the certificate actually controls the domain name. A common challenge involves placing a specific file on the web server's directory. Responding to the Challenge:The web server software must complete the challenge. In this example, it would place the specific file in the designated directory on the server. Verification by Let's Encrypt:Once the web server software completes the challenge, Let's Encrypt CA verifies the response. Two Possible Outcomes: Success:If the challenge response is valid, Let's Encrypt CA issues a new SSL/TLS certificate for the web server's domain name. The web server software then downloads the certificate from Let's Encrypt CA. The downloaded certificate is installed on the web server. Finally, the web server is configured to enable HTTPS, which encrypts communication between the website and visitors. Failure:If the challenge response is invalid (e.g., the file wasn't placed correctly), Let's Encrypt CA informs the web server of the failure. In this case, the web server software would likely retry the entire process by requesting a new certificate again. Let's Encrypt and Key Pinning Let's Encrypt recently introduced new intermediate certificates to replace older ones that are nearing expiration. These new certificates are designed to be more secure and efficient. One of the goals is to discourage the use of an outdated practice known as key pinning. Key pinning refers to a security practice where software applications are configured to trust only a specific set of cryptographic keys issued by a certificate authority (CA). In the context of Let's Encrypt, this would involve an application trusting only a particular intermediate certificate used by Let's Encrypt to sign website certificates. There are a few reasons why Let's Encrypt discourages key pinning: Manual Updates:Key pinning typically requires manual updates whenever a certificate authority changes its certificates, which can be a cumbersome and error-prone process. Reduced Flexibility:Pinned keys limit your ability to benefit from security improvements or optimizations introduced by the CA's newer certificates. Potential Outages:If a pinned certificate expires or becomes invalid, applications that rely on it may malfunction or fail entirely, potentially leading to outages. Let's Encrypt argues that trusting the built-in trust store of your operating system or web browser is a more secure and flexible approach. These trust stores are automatically updated to reflect changes made by certificate authorities, reducing the risk of errors and outages. However, there are some niche cases where key pinning might still be considered justified. For instance, an organization might pin a key if they have a specific security requirement to strictly limit trusted certificates. Overall, Let's Encrypt's move to new intermediate certificates aims to improve security and efficiency while promoting a more automated and flexible approach to certificate trust management.682Views0likes0Comments