Proxy Protocol v2 Initiator
Problem this snippet solves: Proxy Protocol v1 related articles have already been posted on DevCentral, but there is no v2 support iRule code available. A customer wanted to support Proxy Protocol v2, so I wrote an iRule code for supporting v2. Proxy protocol for the BIG-IP (f5.com) How to use this snippet: Back-end server must handle Proxy header prior data exchange. Code : when CLIENT_ACCEPTED { # DEBUG On/Off set DEBUG 0 set v2_proxy_header "0d0a0d0a000d0a515549540a" # v2 version and command : 0x21 - version 2 & PROXY command set v2_ver_command "21" # v2 address family and transport protocol : 0x11 - AF_INET (IPv4) & TCP protocol set v2_af_tp "11" # v2 Address Size : 0x000C - 12 bytes for IPv4 + TCP set v2_address_length "000c" # Get TCP port - 2 byte hexadecimal format set src_port [format "%04x" [TCP::client_port]] set dst_port [format "%04x" [TCP::local_port]] # Get Src Address and convert to 4 byte hexadecimal format foreach val [split [IP::client_addr] "."] { append src_addr [format "%02x" $val] } # Get Dst Address and convert to 4 byte hexadecimal format foreach val [split [IP::local_addr] "."] { append dst_addr [format "%02x" $val] } # Build proxy v2 data set proxy_data [binary format H* "${v2_proxy_header}${v2_ver_command}${v2_af_tp}${v2_address_length}${src_addr}${dst_addr}${src_port}${dst_port}"] if { $DEBUG } { binary scan $proxy_data H* proxy_dump log local0. "[IP::client_addr]:[TCP::client_port]_[IP::local_addr]:[TCP::local_port] - proxy_data dump : $proxy_dump" } } when SERVER_CONNECTED { TCP::respond $proxy_data }23Views1like0Comments
APM Configuration to Support Duo MFA using iRule
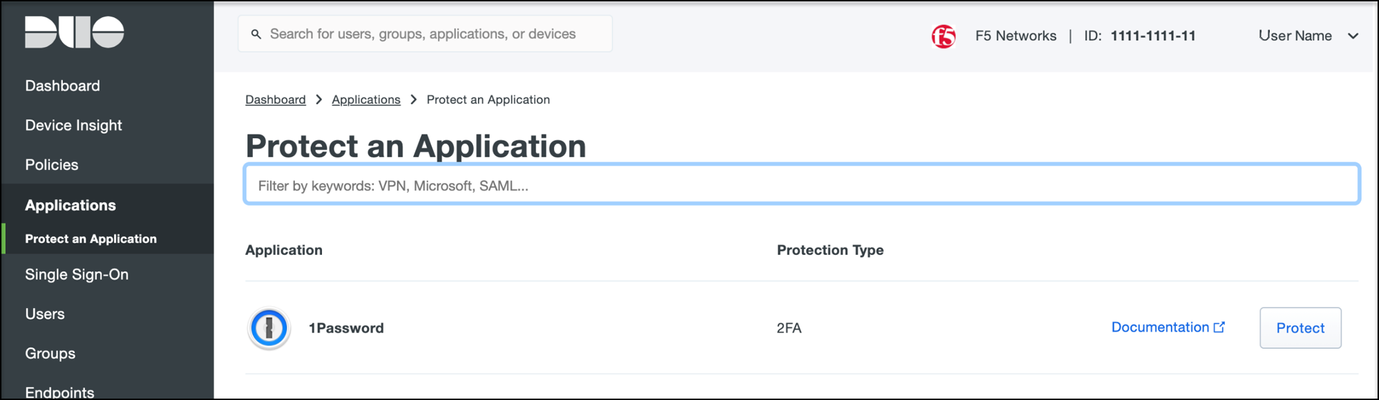
Overview BIG-IP APM has supported Duo as an MFA provider for a long time with RADIUS-based integration. Recently, Duo has added support for Universal Prompt that uses Open ID Connect (OIDC) protocol to provide two-factor authentication. To integrate APM as an OIDC client and resource server, and Duo as an Identity Provider (IdP), Duo requires the user’s logon name and custom parameters to be sent for Authentication and Token request. This guide describes the configuration required on APM to enable Duo MFA integration using an iRule. iRules addresses the custom parameter challenges by generating the needed custom values and saving them in session variables, which the OAuth Client agent then uses to perform MFA with Duo. This integration procedure is supported on BIG-IP versions 13.1, 14.1x, 15.1x, and 16.x. To integrate Duo MFA with APM, complete the following tasks: 1. Choose deployment type: Per-request or Per-session 2. Configure credentials and policies for MFA on the DUO web portal 3. Create OAuth objects on the BIG-IP system 4. Configure the iRule 5. Create the appropriate access policy/policies on the BIG-IP system 6. Apply policy/policies and iRule to the APM virtual server Choose deployment type APM supports two different types of policies for performing authentication functions. Per-session policies: Per-session policies provide authentication and authorization functions that occur only at the beginning of a user’s session. These policies are compatible with most APM use cases such as VPN, Webtop portal, Remote Desktop, federation IdP, etc. Per-request policies: Per-request policies provide dynamic authentication and authorization functionality that may occur at any time during a user’s session, such as step-up authentication or auditing functions only for certain resources. These policies are only compatible with Identity Aware Proxy and Web Access Management use cases and cannot be used with VPN or webtop portals. This guide contains information about setting up both policy types. Prerequisites Ensure the BIG-IP system has DNS and internet connectivity to contact Duo directly for validating the user's OAuth tokens. Configure credentials and policies for MFA on Duo web portal Before you can protect your F5 BIG-IP APM Web application with Duo, you will first need to sign up for a Duo account. 1. Log in to the Duo Admin Panel and navigate to Applications. 2. Click Protect an application. Figure 1: Duo Admin Panel – Protect an Application 3. Locate the entry for F5 BIG-IP APM Web in the applications list and click Protect to get the Client ID, Client secret, and API hostname. You will need this information to configure objects on APM. Figure 2: Duo Admin Panel – F5 BIG-IP APM Web 4. As DUO is used as a secondary authentication factor, the user’s logon name is sent along with the authentication request. Depending on your security policy, you may want to pre-provision users in Duo, or you may allow them to self-provision to set their preferred authentication type when they first log on. To add users to the Duo system, navigate to the Dashboard page and click the Add New...-> Add User button. A Duo username should match the user's primary authentication username. Refer to the https://duo.com/docs/enrolling-users link for the different methods of user enrollment. Refer to Duo Universal Prompt for additional information on Duo’s two-factor authentication. Create OAuth objects on the BIG-IP system Create a JSON web key When APM is configured to act as an OAuth client or resource server, it uses JSON web keys (JWKs) to validate the JSON web tokens it receives from Duo. To create a JSON web key: 1. On the Main tab, select Access > Federation > JSON Web Token > Key Configuration. The Key Configuration screen opens. 2. To add a new key configuration, click Create. 3. In the ID and Shared Secret fields, enter the Client ID and Client Secret values respectively obtained from Duo when protecting the application. 4. In the Type list, select the cryptographic algorithm used to sign the JSON web key. Figure 3: Key Configuration screen 5. Click Save. Create a JSON web token As an OAuth client or resource server, APM validates the JSON web tokens (JWT) it receives from Duo. To create a JSON web token: 1. On the Main tab, select Access > Federation > JSON Web Token > Token Configuration. The Token Configuration screen opens. 2. To add a new token configuration, click Create. 3. In the Issuer field, enter the API hostname value obtained from Duo when protecting the application. 4. In the Signing Algorithms area, select from the Available list and populate the Allowed and Blocked lists. 5. In the Keys (JWK) area, select the previously configured JSON web key in the allowed list of keys. Figure 4: Token Configuration screen 6. Click Save. Configure Duo as an OAuth provider APM uses the OAuth provider settings to get URIs on the external OAuth authorization server for JWT web tokens. To configure an OAuth provider: 1. On the Main tab, select Access > Federation > OAuth Client / Resource Server > Provider. The Provider screen opens. 2. To add a provider, click Create. 3. In the Name field, type a name for the provider. 4. From the Type list, select Custom. 5. For Token Configuration (JWT), select a configuration from the list. 6. In the Authentication URI field, type the URI on the provider where APM should redirect the user for authentication. The hostname is the same as the API hostname in the Duo application. 7. In the Token URI field, type the URI on the provider where APM can get a token. The hostname is the same as the API hostname in the Duo application. Figure 5: OAuth Provider screen 8. Click Finished. Configure Duo server for APM The OAuth Server settings specify the OAuth provider and role that Access Policy Manager (APM) plays with that provider. It also sets the Client ID, Client Secret, and Client’s SSL certificates that APM uses to communicate with the provider. To configure a Duo server: 1. On the Main tab, select Access > Federation > OAuth Client / Resource Server > OAuth Server. The OAuth Server screen opens. 2. To add a server, click Create. 3. In the Name field, type a name for the Duo server. 4. From the Mode list, select how you want the APM to be configured. 5. From the Type list, select Custom. 6. From the OAuth Provider list, select the Duo provider. 7. From the DNS Resolver list, select a DNS resolver (or click the plus (+) icon, create a DNS resolver, and then select it). 8. In the Token Validation Interval field, type a number. In a per-request policy subroutine configured to validate the token, the subroutine repeats at this interval or the expiry time of the access token, whichever is shorter. 9. In the Client Settings area, paste the Client ID and Client secret you obtained from Duo when protecting the application. 10. From the Client's ServerSSL Profile Name, select a server SSL profile. Figure 6: OAuth Server screen 11. Click Finished. Configure an auth-redirect-request and a token-request Requests specify the HTTP method, parameters, and headers to use for the specific type of request. An auth-redirect-request tells Duo where to redirect the end-user, and a token-request accesses the authorization server for obtaining an access token. To configure an auth-redirect-request: 1. On the Main tab, select Access > Federation > OAuth Client / Resource Server > Request. The Request screen opens. 2. To add a request, click Create. 3. In the Name field, type a name for the request. 4. For the HTTP Method, select GET. 5. For the Type, select auth-redirect-request. 6. As shown in Figure 7, specify the list of GET parameters to be sent: request parameter with value depending on the type of policy For per-request policy: %{subsession.custom.jwt_duo} For per-session policy: %{session.custom.jwt_duo} client_id parameter with type client-id response_type parameter with type response-type Figure 7: Request screen with auth-redirect-request (Use “subsession.custom…” for Per-request or “session.custom…” for Per-session) 7. Click Finished. To configure a token-request: 1. On the Main tab, select Access > Federation > OAuth Client / Resource Server > Request. The Request screen opens. 2. To add a request, click Create. 3. In the Name field, type a name for the request. 4. For the HTTP Method, select POST. 5. For the Type, select token-request. 6. As shown in Figure 8, specify the list of POST parameters to be sent: client_assertion parameter with value depending on the type of policy For per-request policy: %{subsession.custom.jwt_duo_token} For per-session policy: %{session.custom.jwt_duo_token} client_assertion_type parameter with value urn:ietf:params:oauth:client-assertion-type:jwt-bearer grant_type parameter with type grant-type redirect_uri parameter with type redirect-uri Figure 8: Request screen with token-request (Use “subsession.custom…” for Per-request or “session.custom…” for Per-session) 7. Click Finished. Configure the iRule iRules gives you the ability to customize and manage your network traffic. Configure an iRule that creates the required sub-session variables and usernames for Duo integration. Note: This iRule has sections for both per-request and per-session policies and can be used for either type of deployment. To configure an iRule: 1. On the Main tab, click Local Traffic > iRules. 2. To create an iRules, click Create. 3. In the Name field, type a name for the iRule. 4. Copy the sample code given below and paste it in the Definition field. Replace the following variables with values specific to the Duo application: <Duo Client ID> in the getClientId function with Duo Application ID. <Duo API Hostname> in the createJwtToken function with API Hostname. For example, https://api-duohostname.com/oauth/v1/token. <JSON Web Key> in the getJwkName function with the configured JSON web key. Note: The iRule ID here is set as JWT_CREATE. You can rename the ID as desired. You specify this ID in the iRule Event agent in Visual Policy Editor. Note: The variables used in the below example are global, which may affect your performance. Refer to the K95240202: Understanding iRule variable scope article for further information on global variables, and determine if you use a local variable for your implementation. proc randAZazStr {len} { return [subst [string repeat {[format %c [expr {int(rand() * 26) + (rand() > .5 ? 97 : 65)}]]} $len]] } proc getClientId { return <Duo Client ID> } proc getExpiryTime { set exp [clock seconds] set exp [expr $exp + 900] return $exp } proc getJwtHeader { return "{\"alg\":\"HS512\",\"typ\":\"JWT\"}" } proc getJwkName { return <JSON Web Key> #e.g. return "/Common/duo_jwk" } proc createJwt {duo_uname} { set header [call getJwtHeader] set exp [call getExpiryTime] set client_id [call getClientId] set redirect_uri "https://" set redirect [ACCESS::session data get "session.server.network.name"] append redirect_uri $redirect append redirect_uri "/oauth/client/redirect" set payload "{\"response_type\": \"code\",\"scope\":\"openid\",\"exp\":${exp},\"client_id\":\"${client_id}\",\"redirect_uri\":\"${redirect_uri}\",\"duo_uname\":\"${duo_uname}\"}" set jwt_duo [ ACCESS::oauth sign -header $header -payload $payload -alg HS512 -key [call getJwkName] ] return $jwt_duo } proc createJwtToken { set header [call getJwtHeader] set exp [call getExpiryTime] set client_id [call getClientId] set aud "<Duo API Hostname>/oauth/v1/token" #Example: set aud https://api-duohostname.com/oauth/v1/token set jti [call randAZazStr 32] set payload "{\"sub\": \"${client_id}\",\"iss\":\"${client_id}\",\"aud\":\"${aud}\",\"exp\":${exp},\"jti\":\"${jti}\"}" set jwt_duo [ ACCESS::oauth sign -header $header -payload $payload -alg HS512 -key [call getJwkName] ] return $jwt_duo } when ACCESS_POLICY_AGENT_EVENT { set irname [ACCESS::policy agent_id] if { $irname eq "JWT_CREATE" } { set ::duo_uname [ACCESS::session data get "session.logon.last.username"] ACCESS::session data set session.custom.jwt_duo [call createJwt $::duo_uname] ACCESS::session data set session.custom.jwt_duo_token [call createJwtToken] } } when ACCESS_PER_REQUEST_AGENT_EVENT { set irname [ACCESS::perflow get perflow.irule_agent_id] if { $irname eq "JWT_CREATE" } { set ::duo_uname [ACCESS::session data get "session.logon.last.username"] ACCESS::perflow set perflow.custom [call createJwt $::duo_uname] ACCESS::perflow set perflow.scratchpad [call createJwtToken] } } Figure 9: iRule screen 5. Click Finished. Create the appropriate access policy/policies on the BIG-IP system Per-request policy Skip this section for a per-session type deployment The per-request policy is used to perform secondary authentication with Duo. Configure the access policies through the access menu, using the Visual Policy Editor. The per-request access policy must have a subroutine with an iRule Event, Variable Assign, and an OAuth Client agent that requests authorization and tokens from an OAuth server. You may use other per-request policy items such as URL branching or Client Type to call Duo only for certain target URIs. Figure 10 shows a subroutine named duosubroutine in the per-request policy that handles Duo MFA authentication. Figure 10: Per-request policy in Visual Policy Editor Configuring the iRule Event agent The iRule Event agent specifies the iRule ID to be executed for Duo integration. In the ID field, type the iRule ID as configured in the iRule. Figure 11: iRule Event agent in Visual Policy Editor Configuring the Variable Assign agent The Variable Assign agent specifies the variables for token and redirect requests and assigns a value for Duo MFA in a subroutine. This is required only for per-request type deployment. Add sub-session variables as custom variables and assign their custom Tcl expressions as shown in Figure 12. subsession.custom.jwt_duo_token = return [mcget {perflow.scratchpad}] subsession.custom.jwt_duo = return [mcget {perflow.custom}] Figure 12: Variable Assign agent in Visual Policy Editor Configuring the OAuth Client agent An OAuth Client agent requests authorization and tokens from the Duo server. Specify OAuth parameters as shown in Figure 13. In the Server list, select the Duo server to which the OAuth client directs requests. In the Authentication Redirect Request list, select the auth-redirect-request configured earlier. In the Token Request list, select the token-request configured earlier. Some deployments may not need the additional information provided by OpenID Connect. You could, in that case, disable it. Figure 13: OAuth Client agent in Visual Policy Editor Per-session policy Configure the Per Session policy as appropriate for your chosen deployment type. Per-request: The per-session policy must contain at least one logon page to set the username variable in the user’s session. Preferably it should also perform some type of primary authentication. This validated username is used later in the per-request policy. Per-session: The per-session policy is used for all authentication. A per-request policy is not used. Figures 14a and 14b show a per-session policy that runs when a client initiates a session. Depending on the actions you include in the access policy, it can authenticate the user and perform actions that populate session variables with data for use throughout the session. Figure 14a: Per-session policy in Visual Policy Editor performs both primary authentication and Duo authentication (for per-session use case) Figure 14b: Per-session policy in Visual Policy Editor performs primary authentication only (for per-request use case) Apply policy/policies and iRule to the APM virtual server Finally, apply the per-request policy, per-session policy, and iRule to the APM virtual server. You assign iRules as a resource to the virtual server that users connect. Configure the virtual server’s default pool to the protected local web resource. Apply policy/policies to the virtual server Per-request policy To attach policies to the virtual server: 1. On the Main tab, click Local Traffic > Virtual Servers. 2. Select the Virtual Server. 3. In the Access Policy section, select the policy you created. 4. Click Finished. Figure 15: Access Policy section in Virtual Server (per-request policy) Per-session policy Figure 16 shows the Access Policy section in Virtual Server when the per-session policy is deployed. Figure 16: Access Policy section in Virtual Server (per-session policy) Apply iRule to the virtual server To attach the iRule to the virtual server: 1. On the Main tab, click Local Traffic > Virtual Servers. 2. Select the Virtual Server. 3. Select the Resources tab. 4. Click Manage in the iRules section. 5. Select an iRule from the Available list and add it to the Enabled list. 6. Click Finished.16KViews10likes48CommentsFingerprinting TLS Clients with JA4 on F5 BIG-IP
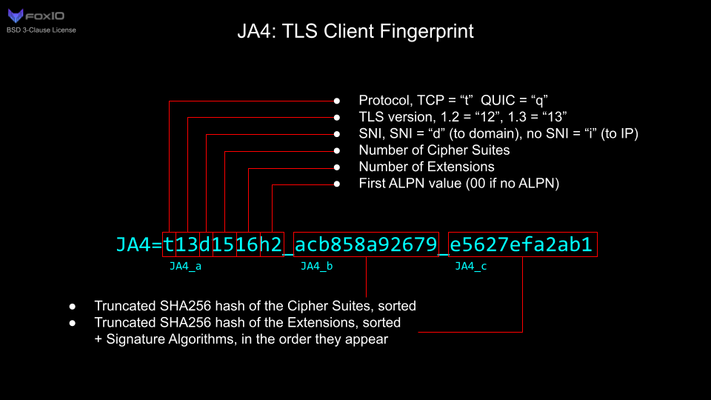
JA4+ is a set of simple network fingerprints thatare both human and machine readable to facilitate more effective threat-hunting and analysis. In this article you will learn how you can use F5 iRules to gerenate JA4 TLS fingerprints.2.9KViews10likes0Comments
Icall script argument
Hello! How I can translate to icall script argument from APM via iRule? Example. I want generate user certificate SSL via APM. I wrote bash script, but it should be called with two argument - UserName and UserDomain. Thank you! sys icall script gcc_script { app-service none definition { exec /home/root/scripts/certificates.sh $UserDN $DomainDN exec istats remove "GCC generate for UserDN" } description none events none }266Views0likes1Comment
FQDN nodes in non-default route domains
Problem this snippet solves: Currently there is no support for FQDN nodes in non-default route domains as per Article. With recent increase in cloud deployment, most of the time there is a requirement from F5 to load balance to servers or ELB in the cloud which has FQDN names as those are having dyanamic IP addresses. If you are using route domains in your BIGIP environment then this becomes a challenge. Below iRule script can be used in those scenerios to use F5 to send traffic to FQDN nodes in non-default route domains. How to use this snippet: If FQDN needs to be resolved by your internal DNS, create performance layer 4 VIP (dns_53) load balancing your DNS servers. DNS server can be used directly in the iRule itself, but it would be better to use a VIP to have redundancy. Create iRule and apply to the VIP Code : when CLIENT_ACCEPTED { set host [RESOLV::lookup @dns_53 "server.example.com"] set ip [getfield $host " " 1] node [lindex $ip 0]%<Rd> 443 } Tested this on version: 14.11.3KViews1like3Comments
Geolocation restrict and redirect to a URL
hi all, Currently we have geolocation restriction enforced, where we only allow user from location APAC and those who are not from APAC region will get the default response page "The requested URL has been rejected. Please contact your administrator", is there a way to configure and redirect them to a custom URL? I tried to test using irules but it doesnt seem to be working. Thanks.50Views0likes3Comments
Name of iRule in variable?
Hi, We use output from iRules both for debugging purposes and also for logging. As a matter of fact the log (ltm.log) becomes pretty cluttered.Part of that is because on first sight you have no way where (i.e. which iRule) an output comes from. In order to make things more readable I thought about including the name of the iRule in a "log local0"-message. Is there any "system-" or "predefined" variable holding the name of the iRule? So for example when I have an iRule named "abc" this variable should hold the value "abc" whereas the same variable should hold the value "xyz" when being referenced in iRule "xyz". Thanks much in advance for any clue. -ejf5306Views0likes3Comments
VS with Wildcard Pool set path to specific port
Good Day - Today we have a Virtual Server listening on port 443, and an irule with 300+ lines to switch pool based on the path. Example of current irule is below: when HTTP_REQUEST { switch -glob [string tolower [HTTP::path]] { "/site1/score/sap/wbse/search" { pool pool_site1.test.com_34561 } "/site1/score/sap/companycodes" { pool pool_site1.test.com_34561 } "/site2/score/timekeeper/unionmasterdata/contract" { pool pool_site2.test.com_34562 } "/site2/score/timekeeper/unionmasterdata/jobcode" { pool pool_site2.test.com_34562 } "/site3/score/sap/chartofaccounts/glaccount*" { pool pool_site3.test.com_34563 } "/site3/score/timekeeper/timecard/gettimecard" { pool pool_site3.test.com_34563 } default { pool pool_site0.test.com_33333 } } } So the above irule goes on for over 300+ more lines. Here is the problem with this: Above setup we are creating over 200+ individual pools of servers with the same 5 servers but just on different ports. Original reason for all the pools is not every port would be up all the time so in the beginning it was simple just to create a pool, but now this is getting un-managable. What I would like to do is the following: Since all the servers in the over 200+ pools are exactly the same but only on a different port I would like to create a wildcard pool instead with just the 5 servers in them. pool pool_site0.test.com member server0.test.com:0 member server1.test.com:0 member server2.test.com:0 member server3.test.com:0 member server4.test.com:0 Move the path / destination port into a Data group and create an iRule that will match the path then check if the server in the wildcard pool responds to the port and if so then send the request to that server. So requesting assistance on creating an irule that: Read the path on the incoming request Match path in datagroup and map destination port based on path matched in datagroup Check if the servers in the wildcard server pool responds on the port matched if port responds on server, then send request to server that responds. Any assistance would be appreciated. Thx Rich38Views0likes1CommentiRules Editor & Declarative Development with Visual Studio Code
The windows iRule Editor has had a very long life. But...it hasn't been updated in years and really should be sunsetted in your environment. There have been other attempts along the way, from a personal project with a Mac desktop app written in python and Qt that never made it past me, an Eclipse plugin several years back that gained a little traction, but the iRule Editor Joe Pruitt created lived on through all of that. However, there are a couple fantastic options now in the Visual Studio Code marketplace that combine to make for a great iRules development environment and also include the ability to pursue the automation toolchain development as well. Here are the tools you'll need: Visual Studio Code F5 Networks iRules (for iRules command completion and syntax highlighting) The F5 Extension (for session management and soooo much more) ACC Chariot (for converting config from UCS upload to AS3) John Wagnon and I had Ben Gordon on our DevCentral Connects live stream a couple times to highlight the functionality, which as mentioned goes far beyond just iRules. 15KViews6likes1Comment