iCR Python Module for iControl REST
Problem this snippet solves: This is a python module to simplify using iControl REST. Install using pip: pip install iCR or retrieve from https://pypi.python.org/pypi?:action=display&name=iCR&version=2.1 As simple as: #!/usr/bin/env python from iCR import iCR bigip = iCR("172.24.9.132","admin","admin") virtuals = bigip.get("ltm/virtual") for vs in virtuals['items']: print vs['name'] This prints out a list of Virtual Servers. Supported methods: init(hostname,username,password,[timeout,port,icontrol_version,folder,token,debug]) get(url,[select,top,skip,filter]) -> returns data or False getlarge(url,size,[select]) -> Used to retrieve large datasets in chunks. Returns data or False create(url,data) -> returns data or False modify(url,data,[patch=True]) -> returns data or False delete(url) -> returns True or False upload(file) -> file is a local file eg /var/tmp/test.txt, returns True or False download(file) -> files are located in /shared/images, returns True or False create_cert(files) -> files is an array containing paths to cert and key. Returns name of cert or False get_asm_id(name) -> name is the name of a policy. Returns an array of IDs or False create_hash(name) -> name is the name of the partition and policy. eg /Common/test_policy. This reduces the need to retrieve an array of hashes from the BIG-IP. Returns a string. get_token() -> this retrieves a BIG-IP token based on the username and password and sets it as the token in use. Returns the token ID or False delete_token() -> This deletes the object token from the BIG-IP and from the object create_transaction() -> creates a transaction and returns the transaction number ID as a string, or False. Subsequent requests will be added to thetransaction until commit_transaction is called. Transaction ID is stored in object.transaction commit_transaction() -> Commits the transaction stored in object.transaction. Returns True or False command(args,[cmd]) -> Runs a command using the arguments string args. Returns the returned output or True on success or False on failure. Note:Be sure to double-escape single quotes eg \\' and single escape double quotes eg \" cmd options are ping/save/load/restart/reboot Module Variables: icr_session - the link to the requests session raw - the raw returned JSON code - the returned HTTP Status Code eg 200 error - in the case of error, the exception error string headers - the response headers icontrol_version - set this to specify a specific version of iControl debug - boolean True or False to set debugging on or off port - set the port ( 443 by default ) folder - set this to create in a specific partition token - use this to set a specific token. If this is set, it will be used instead of basic auth select - use this with get to select the returned data top - use this with get to return a set number of records skip - use this to skip to a specific record number transaction - stores the Transaction ID How to use this snippet: Examples Setup a REST connection to a device #!/usr/bin/env python from iCR import iCR bigip = iCR("172.24.9.132","admin","admin",timeout=10) Create a Virtual Server vs_config = {'name':'test_vs'} createvs = bigip.create("ltm/virtual",vs_config,timeout=5) Retrieve the VS we just created virt = bigip.get("ltm/virtual/test_vs",select="name") print "Virtual Server created: " + virt['name'] Set the timeout bigip.timeout = 20 Now delete the VS we just created delvs = bigip.delete("ltm/virtual/test_vs") Retrieve ASM policy to ID mapping policies = bigip.get("asm/policies",select="name,id") Print a table of ASM policies with learning mode print print "Policy Name Learning Mode" print "------------------------------------------" for item in policies['items']: enabled = bigip.get("asm/policies/" + item['id'] + "/policy-builder",select="learningMode") print '{:32}'.format(item['name']) + enabled['learningMode'] File upload fp = "/home/pwhite/input.csv" if bigip.upload(fp): print "File " + fp + " uploaded" File download file="BIGIP-12.1.2.0.0.249.iso" download = bigip.download(file) if not download: print "File " + file + " download error" SSL Certificate creation In different folder bigip.folder = "TestFolder" files = ("TestCert.crt","TestCert.key") cert = bigip.create_cert(files) if cert: print "Certificate " + cert + " created" Turn on debugging bigip.debug = True Retrieve ASM policy IDs asm = bigip.get_asm_id("dummy_policy") print len(asm) + " IDs returned" print "ID: " + str(asm[0]) Convert an ASM policy name to hash hash = bigip.create_hash("/Common/test-policy") enabled = bigip.get("asm/policies/" + hash + "/policy-builder",select="learningMode") print '{:32}'.format(item['name']) + enabled['learningMode'] Retrieve and use a token bigip.get_token() Delete the token bigip.delete_token() Developed on Python 2.7 but works with v3. Works on TMOS 11.6 onwards though some features may not be implemented, such as tokens. If you use this and have found bugs, would like to discuss it or suggest features then please PM me on DevCentral. Tested this on version: 13.01.1KViews0likes19Comments
GTM return LDNS IP to client
Problem this snippet solves: We do a lot of our load balancing based on topology rules, so it's often very useful to know where the DNS request is actually coming from rather than just the client's IP and the DNS servers they have configured. Especially if they're behind an ADSL router doing NAT or some other similar set up. This rule simply returns the IP address of the LDNS that eventually made the query to the GTM device in the response to a lookup for the WideIP using the rule, as well as logging the response and perceived location. Code : rule "DNS_debug" partition "Common" { when DNS_REQUEST { host [IP::client_addr] log local0.err "Debug address : [IP::client_addr] [whereis [IP::client_addr]]" } }730Views1like1CommentLogstash pipeline tester
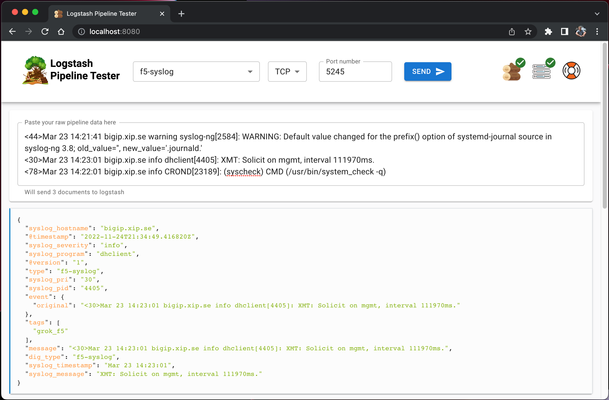
Code is community submitted, community supported, and recognized as ‘Use At Your Own Risk’. Short Description A tool that makes developing logstash pipelines much much easier. Problem solved by this Code Snippet Oh. The problem... Have you ever tried to write a logstash pipeline? Did you suffer hair loss and splitting migraines? So did I. Presenting, logstash pipeline tester which givesyou a web interface where you can paste raw logs, send them to the included logstash instance and see the result directly in the interface. The included logstash instance is also configured to automatically reload once it detects a config change. How to use this Code Snippet TLDR; Don't do this, read the manual or checkout the video below Still here? Ok then! 🙂 Install docker Clone the repo Run these commands in the repo root folder:sudo docker-compose build # Skip sudo if running Windows sudo docker compose up # Skip sudo if running WindowsGo to http://localhost:8080on your PC/Mac Pick a pipeline and send data Edit the pipeline Send data Rince, repeat Version info v1.0.0 Docker containers no longer runs as root Vulnerability fix:https://github.com/epacke/logstash-pipeline-tester/releases/tag/v1.0.0 Video on how to get started: https://youtu.be/Q3IQeXWoqLQ Please note that I accidentally started the interface on port 3000 in the video while the shipped version uses port 8080. It took me roughly 5 hours and more retakes than I can count to make this video so that mistake will be preserved for the internet to laugh at. 🙂 The manual: https://loadbalancing.se/2020/03/11/logstash-testing-tool/ Code Snippet Meta Information Version: Check GitHub Coding Language: NodeJS, Typescript + React Full Code Snippet https://github.com/epacke/logstash-pipeline-tester1.9KViews3likes11CommentsBIG-IP Report
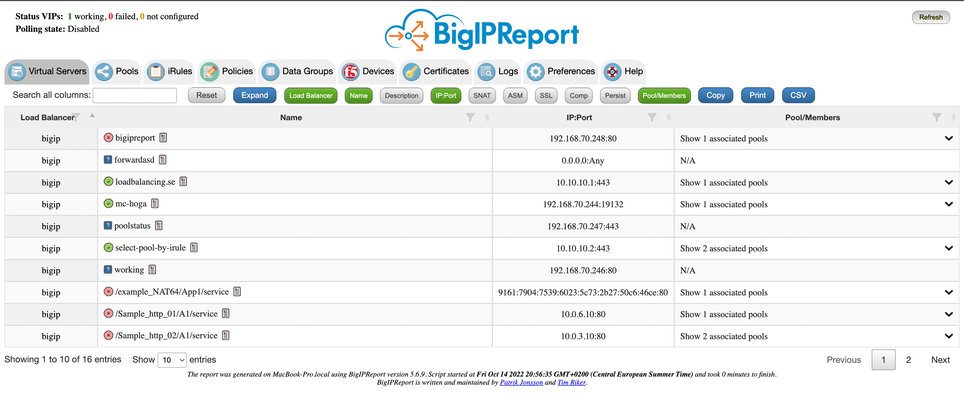
Problem this snippet solves: Overview This is a script which will generate a report of the BIG-IP LTM configuration on all your load balancers making it easy to find information and get a comprehensive overview of virtual servers and pools connected to them. This information is used to relay information to NOC and developers to give them insight in where things are located and to be able to plan patching and deploys. I also use it myself as a quick way get information or gather data used as a foundation for RFC's, ie get a list of all external virtual servers without compression profiles. The script has been running on 13 pairs of load balancers, indexing over 1200 virtual servers for several years now and the report is widely used across the company and by many companies and governments across the world. It's easy to setup and use and only requires auditor (read-only) permissions on your devices. Demo/Preview Interactive demo http://loadbalancing.se/bigipreportdemo/ Screen shots The main report: The device overview: Certificate details: How to use this snippet: Installation instructions BigipReport REST This is the only branch we're updating since middle of 2020 and it supports 12.x and upwards (maybe even 11.6). Downloads (two latest versions): https://loadbalancing.se/downloads/bigipreport-v5.7.0.zip https://loadbalancing.se/downloads/bigipreport-v5.6.5.zip Documentation, installation instructions and troubleshooting:https://loadbalancing.se/bigipreport-rest/ Docker support https://loadbalancing.se/2021/01/05/running-bigipreport-on-docker/ Kubernetes support https://loadbalancing.se/2021/04/16/bigipreport-on-kubernetes/ BIG-IP Report (Legacy) Older version of the report that only runs on Windows and is depending on a Powershell plugin originally written by Joe Pruitt (F5) BIG-IP Report (only download this if you have v10 devices): https://loadbalancing.se/downloads/bigipreport-5.4.0-beta.zip iControl Snapin https://loadbalancing.se/downloads/f5-icontrol.zip Documentation and Installation Instructions https://loadbalancing.se/bigip-report/ Upgrade instructions Protect the report using APM and active directory Written by DevCentral member Shann_P: https://loadbalancing.se/2018/04/08/protecting-bigip-report-behind-an-apm-by-shannon-poole/ Got issues/problems/feedback? Still have issues? Drop a comment below. We usually reply quite fast. Any bugs found, issues detected or ideas contributed makes the report better for everyone, so it's always appreciated. --- Join us on Discord: https://discord.gg/7JJvPMYahA Code : BigIP Report Tested this on version: 12, 13, 14, 15, 1612KViews20likes87CommentsF5 XC reviewing API requests which the GUI sends and a backup of the config with Python/Ansible
Short Description The F5 XC Distributed Cloud GUI in the background sends API requests with JSON body to the system and those requests can be easily reviewed. Problem solved by this Code Snippet If someone wonders how to do some tasks that the XC GUI does the same way but with automation through the API and JSON then this article will help them. Also at the end I have shown how to retrive XC json data with API. How to use this Code Snippet Reviewing the API requests that are generated by the XC GUI. Full Code Snippet There are 3 ways to review the API requests that the GUI generates. On each XC element like for example the load balancer you can click on the JSON and see the JSON code. The JSON code can even be directly edited from the GUI Dashboard! The API documentation can be reviewed directly from the XC GUI. The final option is just to use the browser developer tools and to see what API requests are send by the F5 XC. This feature is now present on most F5 new products like F5OS(Velos/rSeries) and F5 NEXT😉 The XC JSON created objects from the API are a form of a backup configuration. Even if the objects were created from the GUI then API GET requests can be used to retrive their JSON data and this can be saved to a backup file in the form of snapshot. I have used Python with requests library and the url and API key are added as user input arguments. The script can be used to get information like the XC LB or service policies. As example "/api/config/namespaces/default/service_policys". The script will first call an API endpoint to get for example all the load balancer or service policy names and then it will use the names get the config for each individual service policy or load balancer, using a for loop. There is time.sleep(1) to add 1 second slowness between each api request. The code can have the full url like https://{tenant_name}.console.ves.volterra.io/api/config/namespaces/{namespace}service_policysand the api token be added during script execution or the arguments can be input at the start of script execution by commenting outurl = sys.argv[1] and api_token = sys.argv[2] and executing the script like python3 service_policy.py {argument1} {argument2}. The api token by default is hidden using the getpass library for extra security. See Github for the code: Nikoolayy1/xc_api_script: XC API script to retrieve basic json config (github.com) In some cases using Terraform for XC will be best as XC has strong Terraform support as seen at the link below. Ansible can also be used but XC does not have many developed Ansible modules, so in many cases the Ansible URI module will need to be used and the Ansible URI module (ansible.builtin.uri module – Interacts with webservices — Ansible Documentation) in the backgroung is just the python requests or http.client module, as Ansible is python in the background, so better use python directly in that case. XC Terraform: Terraform | F5 Distributed Cloud Tech Docs F5 Distributed Cloud WAAP deployment with Terrafor... - DevCentral Using Terraform and F5® Distributed Cloud Mesh to ... - DevCentral Example Ansible code (even if I said python is better in this case 😀) xc_api_script/xc_ansible at main · Nikoolayy1/xc_api_script (github.com)647Views0likes2CommentsSession Table Export
Problem this snippet solves: This sample goes along with the Tech Tip titled Session Table Exporting With iRules . It creates a mechanism for you to export the data from your session tables for archiving or external reporting. NOTE: This functionality is included in the Session Table Control iRule and is partially rendering here so it has been removed.688Views0likes3CommentsSession Table Control
Problem this snippet solves: This sample goes along with the Tech Tip titled Session Table Control With iRules . It creates an iRules-based HTML application to allow you to view, edit, delete, import, and export your session subtable data. How to use this snippet: Apply to a virtual server with session table entries and you can import/export/edit/delete entries. Code (GitHub gist)1.3KViews0likes5CommentsiCall Script that only runs on Active member
Problem this snippet solves: I had a request to run an iCall script only on the active member in a pair. How to use this snippet: This won't work if you're using active/active via traffic-groups. Code : # Only execute if local BIG-IP is active in failover if {[exec cat /var/prompt/ps1] == "Active"} { tmsh::log "I LIKE SOUP!" } Tested this on version: 12.1705Views0likes2Comments
Create an internal HTTP Load-Balancer on Volterra with Terraform
Problem this snippet solves: How to create an internal HTTP Load-Balancer with VoltMesh where the Origin is reachable through a Volterra node. Two steps are needed: Creation of the Origin (1-origin.tf file) Creation of the Load-Balancer (2-http-lb.tf file) How to use this snippet: Pre-Requirements: Have a Volterra API Certificate. Please see this page for the API Certificate generation: https://volterra.io/docs/how-to/user-mgmt/credentials Extract the certificate and the key from the .p12: openssl pkcs12 -info -in certificate.p12 -out private_key.key -nodes -nocerts openssl pkcs12 -info -in certificate.p12 -out certificate.cert -nokeys Create a variables.tf Terraform variables file: variable "api_cert" { type = string default = "/<full path to>/certificate.cert" } variable "api_key" { type = string default = "/<full path to>/private_key.key" } variable "api_url" { type = string default = "https://<tenant_name>.console.ves.volterra.io/api" } Create a main.tf Terraform file: terraform { required_version = ">= 0.12.9, != 0.13.0" required_providers { volterra = { source = "volterraedge/volterra" version = ">=0.0.6" } } } provider "volterra" { api_cert = var.api_cert api_key = var.api_key url = var.api_url } In the directory where your terraform files are, run: terraform init Then: terraform apply Code : //========================================================================== //Definition of the Origin, 1-origin.tf //Start of the TF file resource "volterra_origin_pool" "sample-http-origin-pool" { name = "sample-http-origin-pool" //Name of the namespace where the origin pool must be deployed namespace = "mynamespace" origin_servers { private_ip { ip = "10.17.20.13" //From which interface of the node onsite the IP of the service is reachable. Value are inside_network / outside_network or both. outside_network = true //Site definition site_locator { site { name = "name-of-the-site" namespace = "system" tenant = "name-of-the-tenant" } } } labels = { } } no_tls = true port = "80" endpoint_selection = "LOCALPREFERED" loadbalancer_algorithm = "LB_OVERRIDE" } //End of the file //========================================================================== //========================================================================== //Definition of the Load-Balancer, 2-http-lb.tf //Start of the TF file resource "volterra_http_loadbalancer" "sample-http-lb" { depends_on = [volterra_origin_pool.sample-http-origin-pool] //Mandatory "Metadata" name = "sample-http-lb" //Name of the namespace where the origin pool must be deployed namespace = "mynamespace" //End of mandatory "Metadata" //Mandatory "Basic configuration" domains = ["mydomain.internal"] http { dns_volterra_managed = false } //End of mandatory "Basic configuration" //Optional "Default Origin server" default_route_pools { pool { name = "sample-http-origin-pool" namespace = "mynamespace" } weight = 1 } //End of optional "Default Origin server" //Mandatory "VIP configuration" advertise_on_public_default_vip = true //End of mandatory "VIP configuration" //Mandatory "Security configuration" no_service_policies = true no_challenge = true disable_rate_limit = true disable_waf = true //End of mandatory "Security configuration" //Mandatory "Load Balancing Control" source_ip_stickiness = true //End of mandatory "Load Balancing Control" } //End of the file //========================================================================== Tested this on version: No Version Found703Views0likes1Comment