JA4 Part 2: Detecting and Mitigating Based on Dynamic JA4 Reputation
In my previous article on JA4 I provided a brief introduction to what is JA4 and JA4+, and I shared an iRule that enables you to generate a JA4 client TLS fingerprint. But having a JA4 fingerprint (or any "identifier") is only valuable if you can take some action on it. It is even more valuable when you can take immediate action on it. In this article, I'll explain how I integrated F5 BIG-IP Advanced WAF with a third-party solution that allowed me to identify JA4s that were consistently doing "bad" things, build a list of those JA4s that have a "bad" reputation, pull that list into the F5 BIG-IP, and finally, make F5 Advanced WAF blocking decisions based on that reputation. Understanding JA4 Fingerprints It is important to understand that a JA4 TLS fingerprint, or any TLS fingerprint for that matter, is NOT a fingerprint of an individual instance of a device or browser. Rather, it is a fingerprint of a TLS "stack" or application. For example, all Chrome browsers of the same version and the same operating system will generate the same JA4 fingerprint*. Similarly, all Go HTTP clients with the same version and operating system will generate an identical JA4 fingerprint. Because of this, we have to be careful when taking action based on JA4 fingerprints. We cannot simply block in our various security devices based on JA4 fingerprint alone UNLESS we can be certain that ALL (or nearly all) requests with that JA4 are malicious. To make this determination, we need to watch requests over time. TLDR; I used CrowdSec Security Engine to build a JA4 real-time reputation database; and 3 irules, an iCall script, and a custom WAF violation to integrate that JA4 reputation into F5 BIG-IP Advanced WAF. CrowdSec and John Althouse - Serendipity While at Black Hat each year, I frequently browse the showroom floor (when I'm not working the F5 booth) looking for cool new technology, particularly cool new technology that can potentially be integrated with F5 security solutions. Last year I was browsing the floor and came across CrowdSec. As the name suggests, CrowdSec provides a crowd-sourced IP reputation service. I know, I know. On the surface this doesn't sound that exciting — there are hundreds of IP reputation services out there AND IP address, as an identifier of a malicious entity, is becoming (has become?) less and less valuable. So what makes CrowdSec any different? Two things jumped out at me as I looked at their solution. First, while they do provide a central crowd-sourced IP reputation service like everyone else, they also have "Security Engines". A security engine is an agent/application that you can install on-premises that can consume logs from your various security devices, process those logs based on "scenarios" that you define, and produce a reputation database based on those scenarios. This enables you to create an IP reputation feed that is based on your own traffic/logs and based on your own conditions and criteria for what constitutes "malicious" for your organization. I refer to this as "organizationally-significant" reputation. AND, because this list can be updated very frequently (every few seconds if you wanted) and pushed/pulled into your various security devices very frequently (again, within seconds), you are afforded the ability to block for much shorter periods of time and, possibly, more liberally. Inherent in such an architecture, as well, is the ability for your various security tools to share intelligence in near real-time. i.e. If your firewall identifies a bad actor, your WAF can know about that too. Within seconds! At this point you're probably wondering, "How does this have anything to do with JA4?" Second, while the CrowdSec architecture was built to provide IP reputation feeds, I discovered that it can actually create a reputation feed based on ANY "identifier". In the weeks leading up to Black Hat last year, I had been working with John Althouse on the JA4+ spec and was actually meeting him in person for the first time while there. So JA4 was at the forefront of my mind. I wondered if I could use CrowdSec to generate a reputation based on a JA4 fingerprint. Yes! You can! Deploying CrowdSec As soon as I got home from Black Hat, I started playing. I already had my BIG-IP deployed, generating JA4s, and including those in the WAF logs. Following the very good documentation on their site, I created an account on CrowdSec's site and deployed a CrowdSec Security Engine on an Ubuntu box that I deployed next to my BIG-IP. It is beyond the scope of this article to detail the complete deployment process but, I will include details relevant to this article. After getting the CrowdSec Security Engine deployed I needed to configure a parser so that the CrowdSec Security Engine (hereafter referred to simply as "SE") could properly parse the WAF logs from F5. Following their documentation, I created a YAML file at /etc/crowdsec/parsers/s01-parse/f5-waf-logs.yaml: onsuccess: next_stage debug: false filter: "evt.Parsed.program == 'ASM'" name: f5/waf-logs description: "Parse F5 ASM/AWAF logs" pattern_syntax: F5WAF: 'unit_hostname="%{DATA:unit_hostname}",management_ip_address="%{DATA:management_ip_address}",management_ip_address_2="%{DATA:management_ip_address_2}",http_class_name="%{DATA:http_class_name}",web_application_name="%{DATA:web_application_name}",policy_name="%{DATA:policy_name}",policy_apply_date="%{DATA:policy_apply_date}",violations="%{DATA:violations}",support_id="%{DATA:support_id}",request_status="%{DATA:request_status}",response_code="%{DATA:response_code}",ip_client="%{IP:ip_client}",route_domain="%{DATA:route_domain}",method="%{DATA:method}",protocol="%{DATA:protocol}",query_string="%{DATA:query_string}",x_forwarded_for_header_value="%{DATA:x_forwarded_for_header_value}",sig_ids="%{DATA:sig_ids}",sig_names="%{DATA:sig_names}",date_time="%{DATA:date_time}",severity="%{DATA:severity}",attack_type="%{DATA:attack_type}",geo_location="%{DATA:geo_location}",ip_address_intelligence="%{DATA:ip_address_intelligence}",username="%{DATA:username}",session_id="%{DATA:session_id}",src_port="%{DATA:src_port}",dest_port="%{DATA:dest_port}",dest_ip="%{DATA:dest_ip}",sub_violations="%{DATA:sub_violations}",virus_name="%{DATA:virus_name}",violation_rating="%{DATA:violation_rating}",websocket_direction="%{DATA:websocket_direction}",websocket_message_type="%{DATA:websocket_message_type}",device_id="%{DATA:device_id}",staged_sig_ids="%{DATA:staged_sig_ids}",staged_sig_names="%{DATA:staged_sig_names}",threat_campaign_names="%{DATA:threat_campaign_names}",staged_threat_campaign_names="%{DATA:staged_threat_campaign_names}",blocking_exception_reason="%{DATA:blocking_exception_reason}",captcha_result="%{DATA:captcha_result}",microservice="%{DATA:microservice}",tap_event_id="%{DATA:tap_event_id}",tap_vid="%{DATA:tap_vid}",vs_name="%{DATA:vs_name}",sig_cves="%{DATA:sig_cves}",staged_sig_cves="%{DATA:staged_sig_cves}",uri="%{DATA:uri}",fragment="%{DATA:fragment}",request="%{DATA:request}",response="%{DATA:response}"' nodes: - grok: name: "F5WAF" apply_on: message statics: - meta: log_type value: f5waf - meta: user expression: "evt.Parsed.username" - meta: source_ip expression: "evt.Parsed.ip_client" - meta:violation_rating expression:"evt.Parsed.violation_rating" - meta:request_status expression:"evt.Parsed.request_status" - meta:attack_type expression:"evt.Parsed.attack_type" - meta:support_id expression:"evt.Parsed.support_id" - meta:violations expression:"evt.Parsed.violations" - meta:sub_violations expression:"evt.Parsed.sub_violations" - meta:session_id expression:"evt.Parsed.session_id" - meta:sig_ids expression:"evt.Parsed.sig_ids" - meta:sig_names expression:"evt.Parsed.sig_names" - meta:method expression:"evt.Parsed.method" - meta:device_id expression:"evt.Parsed.device_id" - meta:uri expression:"evt.Parsed.uri" nodes: - grok: pattern: '%{GREEDYDATA}X-JA4: %{DATA:ja4_fp}\\r\\n%{GREEDYDATA}' apply_on: request statics: - meta: ja4_fp expression:"evt.Parsed.ja4_fp" Sending WAF Logs On the F5 BIG-IP, I created a logging profile to send the WAF logs to the CrowdSec Security Engine IP address and port. Defining "Scenarios" At this point, I had the WAF logs being sent to the SE and properly being parsed. Now I needed to define the "scenarios" or the conditions under which I wanted to trigger and alert for an IP address or, in this case, a JA4 fingerprint. For testing purposes, I initially created a very simple scenario that flagged a JA4 as malicious as soon as I saw 5 violations in a sliding 30 second window but only if the violation rating was 3 or higher. That worked great! But that would never be practical in the real world (see the Understanding JA4 Fingerprints section above). I created a more practical "scenario" that only flags a JA4 as malicious if we have seen at least X number of requests AND more than 90% of requests from that JA4 have triggered some WAF violation. The premise with this scenario is that there should be enough legitimate traffic from popular browsers and other client types to keep the percentage of malicious traffic from any of those JA4s below 90%. Again, following the CrowdSec documentation, I created a YAML file at /etc/crowdsec/scenarios/f5-waf-ja4-viol-percent.yaml: type: conditional name: f5/waf-ja4-viol-percent description: "Raise an alert if the percentage of requests from a ja4 finerprint is above X percent" filter: "evt.Meta.violations != 'JA4 Fingerprint Reputation'" blackhole: 300s leakspeed: 5m capacity: -1 condition: | len(queue.Queue) > 10 and (count(queue.Queue, Atof(#.Meta.violation_rating) > 1) / len(queue.Queue)) > 0.9 groupby: "evt.Meta.ja4_fp" scope: type: ja4_fp expression: evt.Meta.ja4_fp labels: service: f5_waf type: waf_ja4 remediation: true debug: false There are a few key lines to call out from this configuration file. leakspeed: This is the "sliding window" within which we are looking for our "scenarios". i.e. events "leak" out of the bucket after 5 minutes. condition: The conditions under which I want to trigger this bucket. For my scenario, I have defined a condition of at least 10 events (with in that 5 minute window) AND where the total number of events, divided by the number of events where the violation rating is above 1, is greater than 0.9. in other words, if more than 90% of the requests have triggered a WAF violation with a rating higher than 1. filter: used to filter out events that you don't want to include in this scenario. In my case, I do not want to include requests where the only violation is the "JA4 Fingerprint Reputation" violation. groupby: this defines how I want to group requests. Typiiccally, in most CrowdSec scenarios this wil be some IP address field from the logs. In my scenario, I wanted to group by the JA4 fingerprint parsed out of the WAF logs. blackhole: this defines how long I want to "silence" alerts per JA4 fingerprint after this scenario has triggered. This prevents the same scenario from triggering repeatedly every time a new request comes into the bucket. scope: the scope is used by the reputation service to "categorize" alerts triggered by scenarios. the type field is used to define the type of data that is being reported. In most CrowdSec scenarios the type is "ip". In my case, I defined a custom type of "ja4_fp" with an "expression" (or value) of the JA4 fingerprint extracted from the WAF logs. Defining "Profiles" In the CrowdSec configuration "profiles" are used to define the remediation that should be taken when a scenario is triggered. I edited the /etc/crowdsec/profiles.yaml file to include the new profile for my JA4 scenario. name: ban_ja4_fp filters: - Alert.Remediation == true && Alert.GetScope() == "ja4_fp" decisions: - type: ban scope: "ja4_fp" duration: 5m debug: true on_success: continue --- ##### Everything below this point was already in the profiles.yaml file. Truncated here for brevity. name: default_ip_remediation #debug: true filters: - Alert.Remediation == true && Alert.GetScope() == "Ip" decisions: ... on_success: break Again, there are a few key lines from this configuration file. First, I only added a new profile named "ban_ja4_fp" with lines 1 through 9 in the file above. filters: Used to define which triggered scenarios should be included in this profile. In my case, all scenarios with the "remediation" label AND the "ja4_fp" scope. decisions: Used to define what type of remediation should be taken, for which "scope", and for how long. In my case, I chose the default of "ban", for the "ja4_fp" scope, and for 5 minutes. With this configuration in place I sent several malicious requests from my browser to my test application protected by the F5 Advanced WAF. I then checked the CrowdSec decisions list and voila! I had my browser's JA4 fingerprint listed! This was great but I wanted to be able to take action based on this intelligence in the F5 WAF. CrowdSec has the concept of "bouncers". Bouncers are devices the can take action on the remediation decisions generated by the SEs. Technically, anything that can call the local CrowdSec API and take some remediating action can be a bouncer. So, using the CLI on the CrowdSec SE, I defined a new "bouncer" for the F5 BIG-IP. ubuntu@xxxxxxxx:~$ sudo cscli bouncer add f5-bigip Api key for 'f5-bigip': xxxxxxxxxxxxxxxxxxxxxxxxxxxxxxxxxxxx Please keep this key since you will not be able to retrieve it! I knew that I could write an iRule that could call the SE API. However, the latency introduced by a sideband API call on EVERY HTTP request would just be completely untenable. I wanted a way to download the entire reputation list at a regular interval and store it on the F5 BIG-IP in a way that would be easily and efficiently accessible from the data plane. This sounded like a perfect job for an iCall script. Customizing the F5 BIG-IP Configuration If you are not familiar with iCall scripts, they are a programmatic way of checking or altering the F5 configuration based on some trigger; they are to the F5 BIG-IP management plane what iRules are to the data plane. The trigger can be some event, condition, log message, time interval, etc. I needed my iCall script to do two things. First, pull the reputation list from the CrowdSec SE. Second, store that list somewhere accessible to the F5 data plane. Like many of you, my first thought was either an iFile or a data group. Both of these are easily configurable components accessible via iCall scripts that are also accessible via iRules. For several reasons that I will not bother to detail here, I did not want to use either of these solutions, primarily for performance reasons (this reputation lookup needs to be very performant). And the most performant place to store information like this is the session table. The session table is accessible to iRules via "table" commands. However, the session table is not accessible via iCall scripts. At least not directly. I realized that I could send an HTTP request using the iCall script, AND that HTTP request could be to a local virtual server on the same BIG-IP where I could use an iRule to populate the session table with the JA4 reputation list pulled from the CrowdSec SE. The iCall Script From the F5 BIG-IP CLI I created the following iCall script using the tmsh command 'tmsh create sys icall script crowdsec_ja4_rep_update': sys icall script crowdsec_ja4_rep_update { app-service none definition { package require http set csapi_resp [http::geturl http://10.0.2.240:8080/v1/decisions/stream?startup=true&scopes=ja4_fp -headers "X-api-Key 1a234xxxxxxxxxxxxxxe56fab7"] #tmsh::log "[http::data ${csapi_resp}]" set payload [http::data ${csapi_resp}] http::cleanup ${csapi_resp} set tupdate_resp [http::geturl http://10.0.1.110/updatetables -type "application/json" -query ${payload}] tmsh::log "[http::data ${tupdate_resp}]" http::cleanup ${tupdate_resp} } description none events none } Let's dig through this iCall script line by line: 4. Used to "require" or "include" the TCL http library. 5. HTTP request to the CrowdSec API to get the JA4 reputation list. 10.0.2.240:8080 is the IP:port of the CrowdSec SE API /v1/decisions/stream is the API endpoint used to grab an entire reputation list (rather than just query for the status of an individual IP/JA4) startup=true tells the API to send the entire list, not just additions/deletions since the last API call scopes=ja4_fp limits the returned results to just JA4 fingerprint-type decisions -headers "X-api-Key xxxxxxxxxxxxxxxxxxxxxxxxxx" includes the API key generated previously to authenticate the F5 BIG-IP as a "bouncer" 7. Store just the body of the API response in a variable called "payload" 8. free up memory used by the HTTP request tot eh CrowdSec API 9. HTTP Request to a local virtual server (on the same F5 BIG-IP) including the contents of the "payload" variable as the POST body. The IP address needs to be the IP address of the virtual server defined in the next step. An iRule will be created and placed on this virtual server that parses the "payload" and inserts the JA4 reputation list into the session table. An iCall script will not run unless an iCall handler is created that defines when that iCall script should run. I call handlers can be "triggered", "perpetual", or "periodic". I created the following periodic iCall handler to run this iCall script at regular intervals. sys icall handler periodic crowdsec-api-ja4 { interval 30 script crowdsec_ja4_list } This iCall handler is very simple; it has an "interval" for how often you want to run the script and the script that you want to run. I chose to run the iCall script every 30 seconds so that the BIGIP session table would be updated with any new malicious JA4 fingerprints very quickly. But you could choose to run the iCall script every 1 minute, 5 minutes, etc. The Table Updater Virtual Server and iRule I then created a HTTP virtual server with no pool associated to it. This virtual server exists solely to accept and process the HTTP requests from the iCall script. I then created the following iRule to process the requests and payload from the iCall script: proc duration2seconds {durstr} { set h 0 set m 0 set s 0 regexp {(\d+)h} ${durstr} junk h regexp {(\d+)m} ${durstr} junk m regexp {(\d+)\.} ${durstr} junk s set seconds [expr "(${h}*3600) + (${m}*60) + ${s}"] return $seconds } when HTTP_REQUEST { if { ([HTTP::uri] eq "/updatetables" || [HTTP::uri] eq "/lookuptables") && [HTTP::method] eq "POST"} { HTTP::collect [HTTP::header value "content-length"] } else { HTTP::respond 404 } } when HTTP_REQUEST_DATA { #log local0. "PAYLOAD: '[HTTP::payload]'" regexp {"deleted":\[([^\]]+)\]} [HTTP::payload] junk cs_deletes regexp {"new":\[([^\]]+)\]} [HTTP::payload] junk cs_adds if { ![info exists cs_adds] } { HTTP::respond 200 content "NO NEW ENTRIES" return } log local0. "CS Additions: '${cs_adds}'" set records [regexp -all -inline -- {\{([^\}]+)\},?} ${cs_adds}] set update_list [list] foreach {junk record} $records { set urec "" foreach k {scope value type scenario duration} { set v "" regexp -- "\"${k}\":\"?(\[^\",\]+)\"?,?" ${record} junk v log local0. "'${k}': '${v}'" if { ${k} eq "duration" } { set v [call duration2seconds ${v}] } append urec "${v}:" } set urec [string trimright ${urec} ":"] #log local0. "$urec" lappend update_list ${urec} } set response "" foreach entry $update_list { scan $entry {%[^:]:%[^:]:%[^:]:%[^:]:%s} scope entity type scenario duration if { [HTTP::uri] eq "/updatetables" } { table set "${scope}:${entity}" "${type}:${scenario}" indefinite $duration append response "ADDED ${scope}:${entity} FOR ${duration} -- " } elseif { [HTTP::uri] eq "/lookuptables" } { set remaining "" set action "" if { [set action [table lookup ${scope}:${entity}]] ne "" } { set remaining [table lifetime -remaining ${scope}:${entity}] append response "${scope}:${entity} - ${action} - ${remaining}s remaining\r\n" } else { append response "${scope}:${entity} - NOT IN TABLE\r\n" } } } HTTP::respond 200 content "${response}" } I have attempted to include sufficient inline comments so that the iRule is self-explanatory. If you have any questions or comments on this iRule please feel free to DM me. It is important to note here that the iRule is storing not only each JA4 fingerprint in the session table as a key but also the metadata passed back from the CrowdSec API about each JA4 reputation as the value for each key. This metadata includes the scenario name, the "type" or action, and the duration. So at this point I had a JA4 reputation list, updated continuously based on the WAF violation logs and CrowdSec scenarios. I also had an iCall script on the F5 BIG-IP that was pulling that reputation list via the local CrowdSec API every 30 seconds and pushing that reputation list into the local session table on the BIG-IP. Now I just needed to take some action based on that reputation list. Integrating JA4 Reputation into F5 WAF To integrate the JA4 reputation into the F5 Advanced WAF we only need two things: a custom violation defined in the WAF an iRule to lookup the JA4 in the local session table and raise that violation Creating a Custom Violation Creating a custom violation in F5 Advanced WAF (or ASM) will vary slightly depending on which version of the TMOS software you are running. In version 17.1 it is at Security ›› Options : Application Security : Advanced Configuration : Violations List. Select the User-Defined Violations tab and click Create. Give the Violation a Title and define the Type, Severity, and Attack Type. Finally, I modified the Learning and Blocking Settings of my policy to ensure that the new custom violation was set to Alarm and Block. F5 iRule for Custom Violation I then created the following iRule to raise this new custom WAF violation if the JA4 fingerprint is found in the reputation list in the local session table. when ASM_REQUEST_DONE { # Grab JA4 fingerprint from x-ja4 header # This header is inserted by the JA4 irule set ja4_fp [HTTP::header value "x-ja4"] # Lookup JA4 fingerprint in session table if { [set result [table lookup "ja4_fp:${ja4_fp}"]] ne "" } { # JA4 was found in session table, scan the value to get "category" and "action" scan ${result} {%[^:]:%s} action category # Initialize all the nested list of lists format required for the # violation details of the ASM::raise command set viol [] set viol_det1 [] set viol_det2 [] set viol_det3 [] # Populate the variables with values parsed from the session table for this JA4 lappend viol_det1 "JA4 FP" "${ja4_fp}" lappend viol_det2 "CrowdSec Category" "${category}" lappend viol_det3 "CrowdSec Action" "${action}" lappend viol ${viol_det1} ${viol_det2} ${viol_det3} # Raise custom ASM violation with violation details ASM::raise VIOL_JA4_REPUTATION ${viol} } } Again, I tried to include enough inline documentation for the iRule to be self-explanatory. Seeing It All In Action With everything in place, I sent several requests, most malicious and some benign, to the application protected by the F5 Advanced WAF. Initially, only the malicious requests were blocked. After about 60 seconds, ALL of the requests were being blocked due to the new custom violation based on JA4 reputation. Below is a screenshot from one of my honeypot WAF instances blocking real "in-the-wild" traffic based on JA4 reputation. Note that the WAF violation includes (1) the JA4 fingerprint, (2) the "category" (or scenario), and (3) the "action" (or type). Things to Note The API communication between the F5 BIG-IP and the CrowdSec SE is over HTTP. This is obviously insecure; for this proof-of-concept deployment I was just too lazy to spend the extra time to get signed certs on all the devices involved and alter the iCall script to use the TCL SSL library.214Views3likes0CommentsMidnight Blizzard, Polyfill.io and cyber workforce, June 23rd – 29th - This Week In Security
this week a lone there are 50 different security items across the various news and those are the ones that make it to the news. Out of those 50 there are around 20 items that relates to actual incident response7Views0likes0CommentsF5 Distributed Cloud Customer Edge Migration Centos to RHEL
In this article, I will introduce a process to migrate a Customer Edge site from End of Life Centos OS to RHEL Operating System. Introduction: Back in December 2023, F5 Distributed Cloud Customer Edges image was based on Red Hat Enterprise Linux or RHEL. Operating System Prior to that the Customer Edge ran on Centos 7.x Operating System, which has been announced End of Life . In this article, I will provide a migration strategy from Centos to RHEL OS for customer edge sites that are in a SaaS-Hybrid Edge Deployment pattern (#2 in the slide below) where the VIP is on the Regional Edge and the tunnel termination and SNAT are on the customer edge. While we are using this deployment pattern as an example, the concepts for other patterns are the same with a few caveats which I will include at the end of this article. High-Level Concepts: Before we discuss the migration phases, I want to introduce a few concepts that we will be utilizing. The first concept is what we call a Virtual Site. A virtual Site provides us the ability to perform a given configuration on set (or group) of Sites. The second term is Origin Pool. An origin pool is a mechanism to configure a set of endpoints grouped together into a resource pool used in the load balancer configuration. The typical CE Site deployment consists of a HA cluster that discovers endpoints via a origin pool picked via the CE Site. This discovery is typically via Private DNS or RFC-1918 IP ranges, all though other methods are available. When we introduce the virtual site construct we will perform this discovery via a "Virtual Site" and not the original "CE Site". As depicted below on the right hand side of the drawing, you will see the origin pool is now discovered from all 6 nodes in the virtual site and will route traffic to the endpoint per the LB algorithm. Also, the Virtual Site construct can be utilized for more advanced HA design scenarios and even for additional bandwidth between RE and CE, but this will be discussed in other articles. Virtual Site Setup: Perquisites: Current Centos Customer Edge Site. New RHEL OS Customer Site We first start to setup the virtual site construct by logging into our Distributed Cloud tenant. Once logged in: Navigate to "Shared Configuration" Under "Manage" chose "Virtual Site" Provide a Name, Description, Site Type (in this case CE), and a Site Expression Once the Virtual Site label is created, we navigate to the existing Centos CE Cluster and add the Site Expression that we created in previous step to the site Labels section Goto Multi-Cloud Network Connect tile Goto "Manage" "Site Management" and choose the Site, Cloud Deployment site, or Secure Mesh Site. This will depend on how and where the site was deployed. Once you have the correct site click on the 3 ellipses at the right and go to Manage Configuration and Edit Add virtual Site Label Type in the Key from “Site Selector Expression” my example is ”netta-az-vsite” and click Assign a Custom Key ‘netta-az-vsite’ Type in Value from “Site Selector Expression” my example is ”true” and click Assign a Custom Key ‘true’ Proceed with adding this same label to all sites that will be in the virtual site. Virtual Site Origin Pool Configuration: Now that we have our virtual site configured, we need to configure the origin pool and discover from the virtual site. Go to Multi-Cloud Application Connect In origin pool configuration choose the discovery method, IP or DNS of Origin on given sites Under Site or Virtual Site, choose Virtual Site and pick your virtual site from drop-down: Choose the "Virtual Site" configured in the previous step. Rest of config should be the same Validate origin is successfully discovered from newly created Virtual Site. Go to HTTP LB Performance Click on Origins Servers and you should see 2 origins, one form each site (centos and rhel) in virtual site Migration: Now that we have the virtual site and the virtual site origin pool discovery method built, we can start the migration. Goto the HTTP LB and add the additional virtual site origin pool under the Origins section Leverage weights and Priorities with the 2 origin pools to start the migration from the Centos Site to the Virtual site origin pool. Typical starting point is both origin pools will have a Priority of 1 and Weight will be in a value to equal 100. SO Centos origin pool has a weight of 95 and Virtual Site Origin Pool 5 and decrement and increment both as you migrate. Once 100% of traffic is on the Virtual site origin pool remove the Virtual Site label from the centos site. Remove the original Centos Site origin pool form the HTTP LB Delete the Centos Cluster Additional Info: In the above example for the Customer Edge (CE) deployment, we were leveraging the RE's to publish VIPs to the internet and the CE's were used as tunnel termination points as well as SNAT to origin members. If you move the VIP to the CE there are a few caveats with the way to advertise that VIP to the network. For example to leverage all nodes within the cluster, you will need to provide a VIP Advertisement policy that consisted of an out-of-band DNS LB option or nested LB option. Also as mentioned earlier in this article there can also be HA and bandwidth advantages to leveraging virtual sites as depicted below in the last slide. For more info on the migration process or CE design options, reach out to your F5 sales specialist.49Views0likes0CommentsFingerprinting TLS Clients with JA4 on F5 BIG-IP
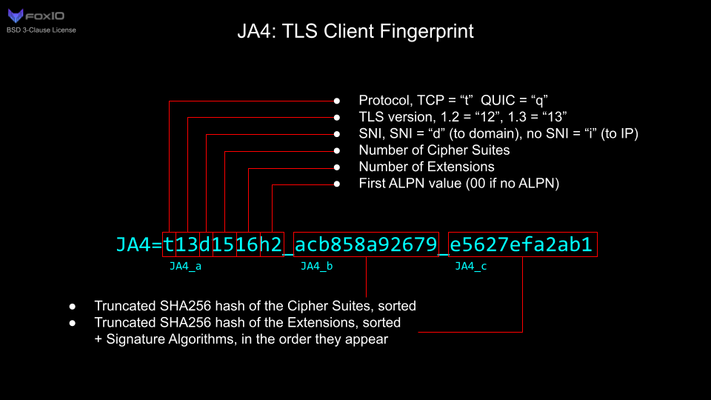
JA4+ is a set of simple network fingerprints thatare both human and machine readable to facilitate more effective threat-hunting and analysis. In this article you will learn how you can use F5 iRules to gerenate JA4 TLS fingerprints.2.7KViews10likes0CommentsConfigure Generic Webhook Alert Receiver using F5 Distributed Cloud Platform
Generic Webhook Alerts feature in F5 Distributed Cloud (F5 XC) gives feasibility to easily configure and send Alert notifications related to Application Infrastructure (IaaS) to specified URL receiver. F5 XC SaaS console platform sends alert messages to web servers to receive as soon as the events gets triggered.51Views0likes0Comments
Apple Passwords, Microsoft Recall, and DJI - May 10th - 16th - This Week In Security
This edition of this week in security is brought to you byKyle_Fox from the F5 SIRT team. This time we touch on Apple's new password manager, Microsoft's attempt to AI everything in Windows, and ongoing attempts to ban DJI drones from use in the United States. Included at the end is a roundup of other news from last week. Apple to include password manager in Apple OSes Apple has announced that they will be including a password management application in their operating systems, this will allow Apple users to store their passwords securely and sync them between all of their Apple devices using iCloud as a backend. This continues Apple's general trend towards identifying use cases being filled by third-party software and creating an inhouse replacement. Hopefully this will push regular users towards more secure passwords and password storage. Microsoft Says They Will Make Security a Priority Just a few weeks ago Microsoft announced a new Windows 11 feature calledRecall. Thisfeature would allow Windows to record all your actions in the operating system and allow you to search with AI for something that happened in the past. This is essentially Microsoft's various CoPilot products, but for the entire operating system. Expects were quick to note that this could provide aneasily to tap supply of surveillance data from a compromised system, allowing attackers to siphon off any data a Windows user is working on. This comes a year after a major breach of Microsoft infrastructure by the Storm-0558 threat actor, for which Microsoft has received a lot of criticism in its handling. This criticism includes a report from the US DHSCyber Safety Review Board report detailing failures that lead to that intrusion as well as further whisleblower complaints related to Microsoft's handling of security in recent years. Microsoft has now backtracked on deploying Recall to all Windows 11 installs, and will be working to make it more secure before release. Microsoft president Brad Smith has further stated to congress that they are working tomake all of their systems and products more secure. But only time will tell if the single highest-risk target for threat groups will live up to the promise of having the most secure software and systems. Congress moves to ban DJI drones amid fears of spying. Recently, lawmakers have been acting on what has seemed to be a long tail of "what ifs" and passing legislation to ban the import and potentially use of DJI drones in the United States. Some following this legislation are not surprised by its sponsors backing, noting thatRep Stefanik is backed by US based drone maker Skydio and industry association AUVSI. I'll admit, I own a couple DJI drones, so I have an interest in them at least being supported in the future, but this recent flare up seems more like a protectionist move without evidence of any actions on the part of the allegedly guilty player. This reminds me a lot of the Supermicro allegations from Bloomberg in 2018, in which Bloomberg alleged that Supermicro server motherboards had been embedded with spying devices. After the report Supermicro worked to audit their supply chain and examine those motherboards for any implants, and found thatno such implants existed. Bloomberg would continue to insist its reporting was correct,doubling down with a new set of allegations in 2021. To date, no such implants have been identified. This same long history of allegations exists in the case of DJI, with the Department of Defense reiterating spying concerns back in 2021 amid concerns about government use of DJI drones. Just like the Huewei ban, this concern also exists in Australia,extending to the general public's use of DJI drones there. So its not surprising the concern has morphed from the military use of DJI drones, to government use, andnow to the US public using them. None of these concerns cite actual actions of DJI, nor has any malicious code been identified yet. Roundup The YouTube recommendation for this time around is Practical Engineering. If your wanting to jump right in with something related to infrastructure security, try the series on the Electric Grid. Toorcamp, literally hacker summer camp, will be happening next week on Orcas Island in Washington. Two people have been arrested in the UK for using a home built cellular base station to send SMS phishing messages. The Australian border force continues its deep inspection of people visiting and returning to Australia with over 10,000 travelers phones searched in the last two years. The French are now entering the Mess With DNS to Block Bad Stuff(TM) game. SpaceX to introduce a miniaturised Starlink terminal.283Views4likes0CommentsF5 Distributed Cloud, from manual configuration to Terraform automation
This article will briefly introduce the "F5 Distributed Cloud Terraform Examples" GitHub repository, aimed at centralizing a number of essential Distributed Cloud Security-focused use cases, along with the corresponding manual (XC console-based) configuration and Terraform automation guides.42Views0likes0CommentsThe Case of the Missing F5 AMI : F5 BIG-IP AMI Lifecycle Events
Today, many F5 customers use AWS, and use the AWS Marketplaceto procure F5 BIG-IP software. Customers that follow this route receivemultiple benefits, such as a simplified procurementprocess and the abilityto use their Enterprise Discount Program (EDP) committed spend for AWS and non AWS software, such as F5, that can be consumed in the marketplace. When a customer uses AWS hourly billing for F5 software, they will use the F5 provided prebuilt machine images (AMI). Other customers my procure a license key for BIG-IP via other means and leveragethe AMIs we provide in AWS for such scenarios. When using AMIs that are created by a thirdparty (any organization other than yours) there are lifecycle events that happen that may make it seem like the AMI has simply vanished. The AMI is there. You just need to use the tools and workflows to continue to see and use it. Lifecycle Event Simplified A lifecycle event is where an organization moves a version of their software fromone state to another. For example an AMI can be in a state of public to and moved to a state of restricted or archived. The event that causes this change could be an end-of sale or a patch has been released for a CVE in which F5 restricts the older version of software from being sold to new customers. New customers will only be able to access the BIG-IP builds that are listed as public.Customers that have already subscribed to anoffer,they will still be able to access the previous versions. Let's review what AWS has to say about a deprecated AMI. After an AMI is deprecated: For AMI users, the deprecated AMI does not appear in DescribeImages API calls unless you specify its ID or specify that deprecated AMIs must appear. AMI owners continue to see deprecated AMIs in DescribeImages API calls. For AMI users, the deprecated AMI is not available to select via the EC2 console. For example, a deprecated AMI does not appear in the AMI catalog in the launch instance wizard. AMI owners continue to see deprecated AMIs in the EC2 console. For AMI users, if you know the ID of a deprecated AMI, you can continue to launch instances using the deprecated AMI by using the API, CLI, or the SDKs. Launch services, such as launch templates and Auto Scaling groups, can continue to reference deprecated AMIs. EC2 instances that were launched using an AMI that is subsequently deprecated are not affected, and can be stopped, started, and rebooted. Accessing the Software Once an image has been deprecated, the user experience to locate the software can vary based on how you are normally interacting with AWS. In our example, we will look for a version of software that we had to recently deprecate: 15.1.5.1-0.0.14. Below you can see I am running a deprecated version; it could also be something you previously used. Please note that F5 recommends that customers always move to patch releases when there is a security fix. With that in mind, and if you cannot move to a new version yet, what are the options to continue to use this software? Marketplace Wizard This path works with out any changes to the normal workflow. Locate the software in marketplace and click through the subscribe (you must have already done this prior to the deprecation) and configuration. Select your verison and continue to launch. Complete the from and launch the instance. My Subscriptions This path works with moderate changes to the normal workflow. If you are looking at my subscriptions page, you will only see the most recently published version of the AMI. If you are an F5 user, this could be a major version that you do not use since the display filter is based on publication date. Let's navigate the Better 200 Mbs subscription Clicking in, we can see the subscriptioninformation and can launch another instance of it. But when we click in, we can only see the latest version by publication date. Just below the software version drop down, you can see a link to use other versions. Which takes you to a screen where you can select a different version of the software. Select the version you want to deploy. EC2 Launch Instance Wizard This path does not work In this path, if we search for the AMI id of the previous version, we will find the listing. Following the launch wizard, it only takes us to the latest version (not even all public versions) and we cannot access the AMI version we want. AWS CLI This path works with changes to the CLI flags. By default, the AWS CLI will not show an AMI version that has been deprecated. [cloudshell-user@ip-10-136-48-97 ~]$ aws ec2 describe-images --owners 679593333241 --filters 'Name=name,Values=F5 BIGIP-15.1.5.1-0.0.14*' --query 'Images[*].[ImageId,Name]' --output yaml [] To locate the AMI, you will need to add the flag of include-deprecated. [cloudshell-user@ip-10-136-48-97 ~]$ aws ec2 describe-images --owners 679593333241 --filters 'Name=name,Values=F5 BIGIP-15.1.5.1-0.0.14*' --query 'Images[*].[ImageId,Name]' --include-deprecated --output yaml - - ami-0a25c6b80ecaf6b81 - F5 BIGIP-15.1.5.1-0.0.14 BYOL-LTM 1Boot Loc-220328012805-8f2ed1fb-93bb-4f06-a8f5-eb84757d5fab - - ami-08b9e9627f579bee6 - F5 BIGIP-15.1.5.1-0.0.14 PAYG-Good 1Gbps-220328013426-7fb2f9db-2a12-4915-9abb-045b6388cccd - - ami-0a3aa4f2b6a3cdeb2 - F5 BIGIP-15.1.5.1-0.0.14 PAYG-Best 25Mbps-220328014320-3e567b08-20a9-444f-a72a-7e8da3c2cbdf - - ami-0de86f325238540d8 - F5 BIGIP-15.1.5.1-0.0.14 PAYG-Better 200Mbps-220328014315-bfe1c762-fc65-48ef-a205-29e2770cb15b - - ami-07dc37ae1b50682ac - F5 BIGIP-15.1.5.1-0.0.14 PAYG-Adv WAF Plus 3Gbps-220328014327-fd904f36-3781-4002-8075-a1ce0da76185 Once you have the AMI ID, you can launch from the CLI (or CFT). - - ami-0de86f325238540d8 - F5 BIGIP-15.1.5.1-0.0.14 PAYG-Better 200Mbps-220328014315-bfe1c762-fc65-48ef-a205-29e2770cb15b [cloudshell-user@ip-10-132-62-194 ~]$ aws ec2 run-instances --image-id ami-0de86f325238540d8 --instance-type m5.2xlarge --subnet-id subnet-0a9daa849fb5f1075 { "Groups": [], "Instances": [ { "AmiLaunchIndex": 0, "ImageId": "ami-0de86f325238540d8", "InstanceId": "i-0a7e6854fdce7c850", "InstanceType": "m5.2xlarge", F5 CloudFormation Templates This path works, but you will need to provide an AMI ID. F5 provides example cloudformation templates that customers can use. In our templates, we allow customers to specify an AMI ID via the customImageID field bigIpCustomImageId No string Provide a custom BIG-IP AMI ID you wish to deploy. Otherwise, can leave empty. If we specify our AMI, the templates will launch as expected. F5 BIG-IP Terraform Module This path works, but you will need to customize your terraform files. By default, the F5 BIG-IP terraform module uses a variable and a data search function to find an AMI. You will need to make changes that make sense in your terraform tools. Let's take a look at the main.tf file that deploys BIG-IP in AWS. resource "aws_instance" "f5_bigip" { instance_type = var.ec2_instance_type ami = data.aws_ami.f5_ami.id key_name = var.ec2_key_name root_block_device { delete_on_termination = true encrypted = var.ebs_volume_encryption kms_key_id = var.ebs_volume_kms_key_arn volume_size = var.ebs_volume_size volume_type = var.ebs_volume_type } Let's trace the logic. We have a viarable that has the name we want to search for in the variables. tf file. variable "f5_ami_search_name" { description = "BIG-IP AMI name to search for" type = string default = "F5 BIGIP-15.1.5* PAYG-Better*" } This variable goes into a data resource via the data.tf file data "aws_ami" "f5_ami" { most_recent = true // owners = ["679593333241"] owners = ["aws-marketplace"] filter { name = "description" values = [var.f5_ami_search_name] } } In reviewing the terraform moduleto locate an AMI, the flags are similar to the cli where you need add the include-deprecated if you are not using an express reference in your terraform files. include_deprecated - (Optional) If true, all deprecated AMIs are included in the response. If false, no deprecated AMIs are included in the response. If no value is specified, the default value is false. Your terraform data.tf file will need to be updated to include deprecated images. data "aws_ami" "f5_ami" { most_recent = true owners = ["679593333241"] include_deprecated = true filter { name = "description" values = [var.f5_ami_search_name] } } Proper Planning Required Many customers are able to use the latest version, but if you need to use a specific version, you need a plan. Lifecycle events will happen and they may happen quickly, such as a CVE that has a high CVSS score. If you cannot automatically move to the patched build, then you need to plan and document the workflows you will use to ensure you can continue operations until such time as you can move to the new AMI. To stay two steps ahead: CLI, API, and automated solutions that search for AMIs — you will need to include deprecated AMIs GUI use cases make sure that your users know how to find different versions in the web portal Always document the AMI id that you use in each region.653Views3likes1Comment